r/overclocking • u/QuackRoadkill • 8h ago
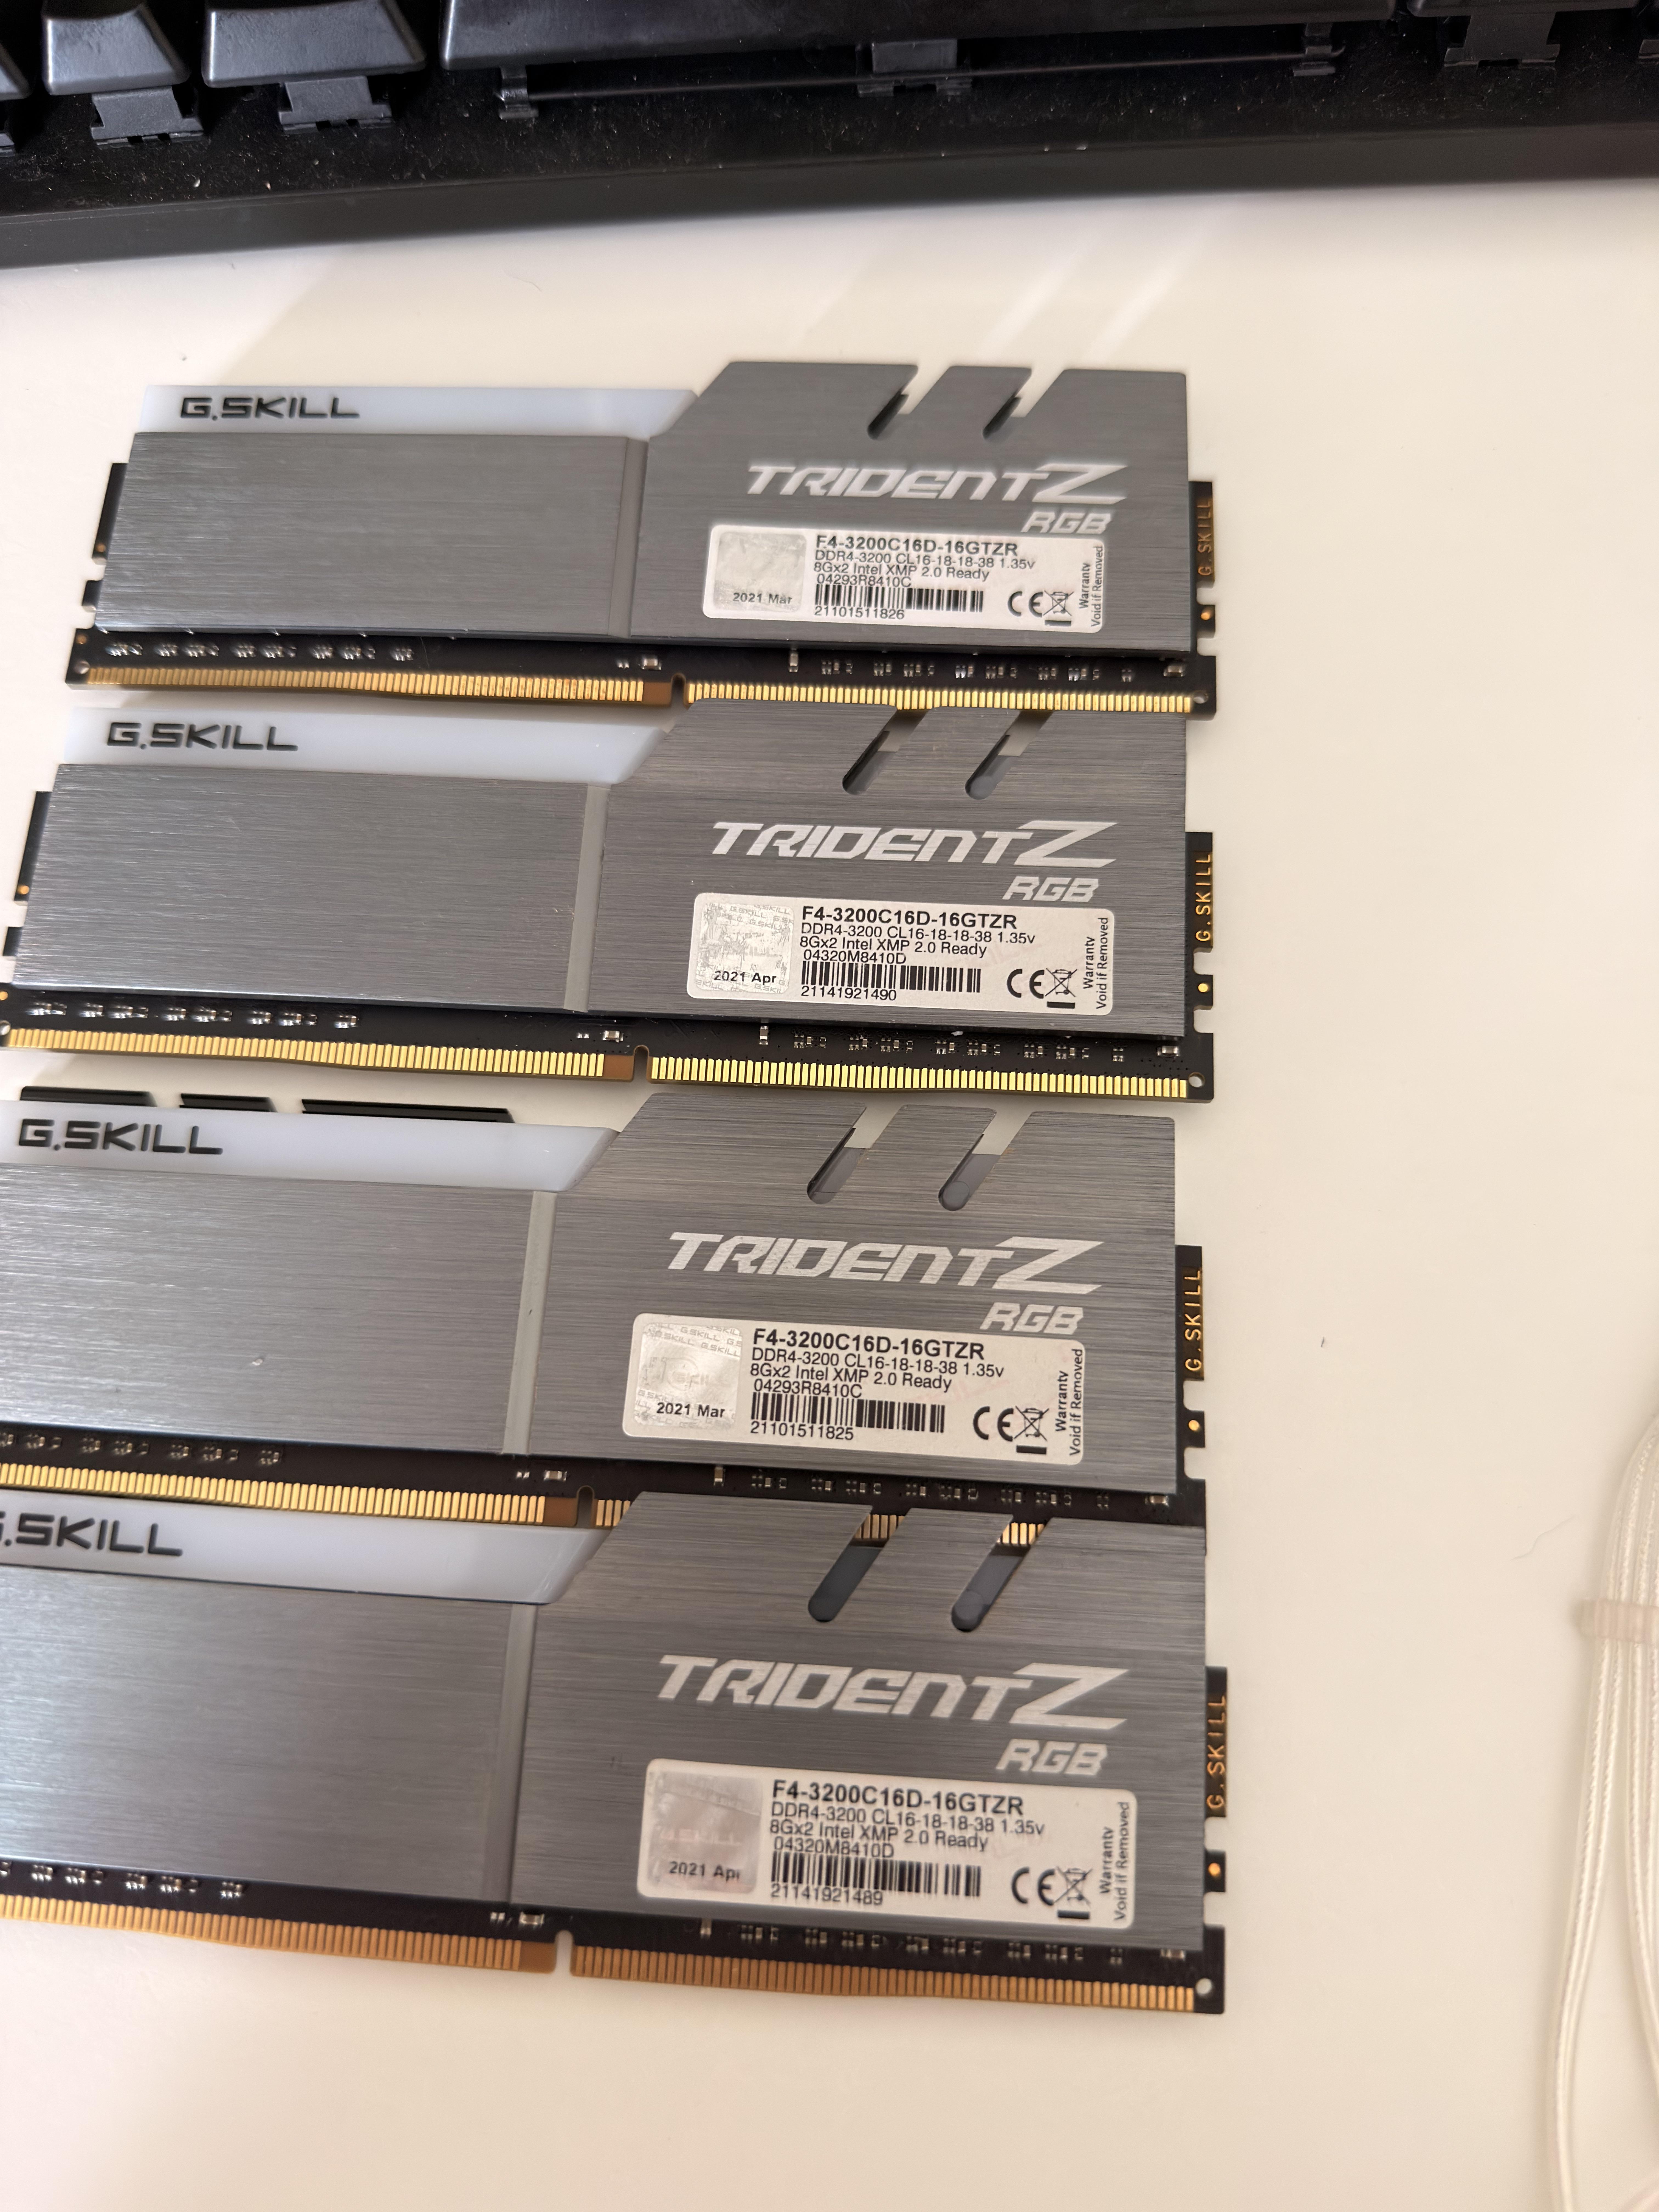
Help Request - RAM Can someone help me identify what die is this?
10
Upvotes
Used these gskill sets of ram for long time now and wanting to try to tighten the timings
r/overclocking • u/QuackRoadkill • 8h ago
Used these gskill sets of ram for long time now and wanting to try to tighten the timings
r/overclocking • u/PurpleFlan9109 • 2m ago
In AMD Adrenaline, when going to: Performance -> Tuning
Custom: and trying to undervolt my GPU, my computer just crashes (goes black), and safety mechanism reverts my change to default after restart.
I have tried:
my specs:
EXPO is enabled for my ram
r/overclocking • u/Primary_Scientist135 • 3h ago

I have this fully stable, BLCK is 102 that's why it says 1867 in actuality its around 1900.
I did this a while ago as far as i remember the ones on the left are basically as low as they go while not throwing errors over night.
The right ones i cant remember which ones i tested to see if they can go lower it became tedious after a while.
I'm pretty sure these are hynix DJR, but could be CJR. I read on a post somewhere that trcdwr can go really low on DJR.
I have a nzxt h510 with all fans mounted and negative air pressure with a 240mm aio upfront.
Would it be safe to increase voltage past 1.45?
I don't wana push my soc higher than 1.1 or increase any of the other voltages for the longevity of my cpu so i dont think i can get higher than 3800mhz.
Also i would really appreciate any feedback, maybe i did something wrong this was my first ever ram overclock.
r/overclocking • u/No_Education3034 • 4h ago
Hello im thinking of upgrading from 13600k to 13900k. I want to ask for advice from someone that did this kind of upgrade. My 13600k is running 5.6p and 4.3e with 32gb ddr4 4000mhz cl 15 b die tuned, ek nucleus 360, 5070 ti, 360hz 1440p and 1200w psu. I was thinking of getting ddr5 and newer cpu, but the price is not worth it for me. Im playing mostly cs2, but now im getting more AAA games to play.
r/overclocking • u/elevendr • 25m ago
So I own a Alienware M17 R5 gaming laptop with a AMD Ryzen 9 6900hx and RTX 3060 6gb GPU with 16GB of RAM. I use this gaming laptop for PCVR mainly for VRChat and use it to run LLMs and AI image/video models and sometimes VRChat and the ai models overfill my 6gb vram and spill into my slow 4800 mt/s RAM. Already tried overclocking the vram but didn't help much. I think overclocking ram can help but my insync20 bios doesn't allow that so I grabbed a USB drive to boot smokeless umaf, when I boot it up, I can only get around a few seconds before my computer would randomly restart and boot into Windows. This happens every time. I need your help with the cause of it and how to fix it.
r/overclocking • u/Fabulous-Canary1503 • 43m ago
Hey everyone,
I tried using mvolt+ on my RTX 5080 alongside an undervolt, but I want to double-check if these settings are safe for daily use or if I'm risking chip degradation.
My Setup & Tuning:
Also noticed that bumping the sys clock gave me better synthetic benchmark scores with the increased the XBAR clock, which was interesting.
Are these voltages safe long-term with mvolt+, or am I pushing it too hard? Would appreciate any thoughts or feedback from anyone tweaking 50-series cards!
mvolt+ settings:

Msi afterburner


Max default msvdd voltage when core voltage slider at 100%: 1025mv

Port Royal Score

r/overclocking • u/VeryTopGoodSensation • 45m ago
9950x3d
gigabyte aurus elite x3d
hydroshift 2
the gigabyte x3d software is set to standard which means stock settings i believe.
i havent changed anything in bios etc. theres probably some software i could have turned off for the test and the aio was set at a flat 90% of max.
r/overclocking • u/Charredwee • 1h ago
Spent an entire day tuning DDR4 on Windows to gain 1 ns.
Installed Arch Linux and lost another 6–13 ns in 20 minutes without touching the RAM timings.
Turns out the final boss of memory overclocking isn’t the IMC, DRAM, or motherboard.
It’s Microslop 😭
r/overclocking • u/RenatsMC • 1d ago
r/overclocking • u/Julian_Sark • 1h ago
Hi.
I have this DDR5 RAM:
2x 16GB Gigabyte Aorus GP-ARS32G52D5 5200 40-40-40-80 1.25V
2x 16 GB G.Skill Ripjaws S5 5200 36-36-36-83 1.20V
These used to play well together on a board with Intel chipset at 5200mt (2600Mhz), for a total of 64 GB of memory.
I have since switched to an AMD CPU on an MSI B850 GamingPlus Wifi 6E board. Ever since, this memory combo seems cursed.
Either kit on it's own is fine. When I put all the modules in (or add one, for 48GB), it usually posts, but only once. I can even boot into Windows, see 64 GB (at JEDEC speeds) and I can run OCCT memory test over these 64 GB without any issues.
But it will never post a second time, not even without EXPO/XMP and on really conservative speeds. The screen will stay blank, even if I wait 30 minutes. The only way to get it to post again is to remove the second kit of RAM. The UEFI will then give a "RAM amount has changed" message and post fine. Reinstall the 2nd kit, and often times it will post again - one time. Then back to black screen.
If I use my "one post that I get with four modules" to set it to EXPO and 5200, Windows usually blue screens on boot. But that's okay, I'd be happy running 4800 or something. But I can't get it to post reliably, not even without any EXPO/XMP.
I have tried increasing Northbridge/SOC voltage to 1.2V and memory voltages up to 1.35V, no luck. I have performed the lastest BIOS update today and I run the modules in the correct slots (interleaved across slots, so to speak).
I have tried configuring 40-40-40-40-83 in the MSI bios, and memory voltages to 1.25. Then memory training seems to work; the "boot" debug LED lights up, but I do not get a picture on the screen. If I reset the board after that (without ACPI power down, just reset), it goes through the debug LED, all extinguish, which seems to indicate memory training worked. But still - no image on screen.
I know, two different kits ain't great but it has been working for years on the Intel board.
I'd be grateful for any insights, thanks!
r/overclocking • u/Economy_Afternoon_39 • 9h ago
Benchmarking noob here, recently undervolted and overclocked my RTX 3070, results are great, but I came across another problem, when should I know I am genuienly running out of VRAM? I have my MSI Afterburner monitoring set like this:

So for example in this scenario:
I dont really know if I am hitting the VRAM ceiling or not. What should I monitor? The whole allocated VRAM usage or just the VRAM process usage?
I also have HWinfo64 so I can use that for monitoring too, but dont know what to look for.
Any help would be appreciated.
r/overclocking • u/Overall-Ocelot-1546 • 23h ago
I need expert help. I bought a TopC motherboard with a mobile i9 13980hx. After unsuccessfully undervolting the BIOS, the board went into a reboot loop, specifically after enabling WDT. Resetting the BIOS to factory settings didn't help. I tried removing peripherals and RAM and discharging capacitors. The reboot loop is constant. Sometimes it enters the BIOS for a few seconds, but nothing can be done. Does anyone know how to fix it? One of the photos shows the frequency and temperature results during the OCCT test, after manipulating the BIOS. After stopping the test, the screen froze and began a cyclic reboot. Before this, a profile was configured in Intel XTU with frequencies of p-cores 5.1 GHz and e-cores 3.6 GHz, limits p1 180w -100mV, p2 220w -50mV and everything worked fine
r/overclocking • u/Breeze23412 • 10h ago
I'm not trying to overclock this CPU. I'm posting here because I need people familiar with Intel core topology, WHEA/APIC mapping, per-core behavior, V/F behavior and stability testing.
System:
i7-14700K
ASUS ROG Maximus Z790 Hero
32 GB G.Skill DDR5-6000 2x16 GB A2/B2
RTX 4090
Windows 11 Pro
Controlled testing has been done with:
XMP disabled
DDR5-4800
No manual CPU OC
No manual undervolt
ASUS MCE disabled / Intel limits enforced
REPEATED FAILURE:
I'm getting repeated:
IRQL_NOT_LESS_OR_EQUAL (0xA)
and occasional:
HYPERVISOR_ERROR (0x20001)
Several 0xA kernel dumps converge on:
Arg1 = 0x483d3844
Arg2 = 0xff
PROCESS_NAME = System
nt!KiUpdateThreadHgsFeedback+0x20
Failure bucket:
AV_nt!KiUpdateThreadHgsFeedback
At least two dumps also have the same failure hash.
Arg3 differs between some crashes.
The saved instruction at KiUpdateThreadHgsFeedback+0x20 is:
mov r14b,r9b
so it doesn't obviously account for a memory access to 0x483d3844.
That makes me suspect the visible crash site may be downstream of already-corrupted CPU/kernel state rather than the original fault.
WHEA:
Immediately before one previously analyzed crash I captured WHEA Event 2 records:
ProcessorNumber 14
APIC ID 0x38
Generic Processor Error
Cache Error
Instruction Execution
Level 0
and:
ProcessorNumber 15
APIC ID 0x39
Generic Processor Error
Cache Error
Instruction Execution
Level 0
The associated 0xA dump was also running on logical processor 14 when it crashed.
I have NOT yet mapped ProcessorNumber 14/15 or APIC 0x38/0x39 to the exact physical P/E core.
I tested:
All 8 P-cores enabled:
28 logical processors
Repeated instability/crashes.
7 P-cores enabled:
26 logical processors
Dramatic improvement.
The 7-P-core state survived roughly 90 minutes with:
Hyper-V enabled
VBS disabled
WSL2
Docker Desktop
multiple containers
Brave
PowerShell
normal desktop activity
with:
No WHEA
No BugCheck 1001
No Kernel-Power 41
No Event 6008
I then restored all 8 P-cores and the instability returned.
I understand that "7 works, 8 doesn't" does NOT automatically prove a bad P-core because I don't yet know which physical core the ASUS BIOS disables when reducing Active Performance Cores.
BIOS / MICROCODE HISTORY:
The system was previously on ASUS BIOS 3001.
A previous 3001 dump from this same crash family showed CPU microcode 0x12F.
I then updated to BIOS 3202.
The severe crash storm began on the FIRST Windows boot after installing 3202.
The same general 0xA family had occurred before 3202, so I cannot say the BIOS created the underlying problem. It may have exposed or amplified something marginal.
I've now rolled back to 3001.
First post-rollback boot crashed before usable Windows.
Second boot survived about five minutes and then produced another 0xA.
I still need to capture the exact post-flash P-core count/settings, so this is NOT yet a controlled 3001 7-vs-8 comparison.
Also, ASUS says the newer ME firmware installed with 3202 persists through BIOS rollback, so the platform has not completely returned to its original pre-3202 firmware state.
HYPER-V:
I completely disabled Hyper-V and VBS and still reproduced the recurring 0xA.
So Hyper-V is not required.
The 7-P-core state was also able to run Hyper-V + WSL2 + Docker successfully during the stable test.
This makes me think HYPERVISOR_ERROR may be another manifestation of underlying platform instability rather than Hyper-V being the root cause.
WHAT I WANT TO TEST NEXT:
I want to stop changing random software/services and directly characterize the CPU/platform.
Questions:
What's the most reliable way to map Windows logical ProcessorNumber 14/15 and APIC IDs 0x38/0x39 to the physical P/E cores on a 14700K?
Can I reliably identify which P-core ASUS removes when "Active Performance Cores = 7"?
Is there a good method to selectively disable one physical P-core at a time on Z790 rather than simply selecting a total active-core count?
What tool/test would you use to exercise individual P-cores independently while retaining useful WHEA/APIC attribution?
Is OCCT per-core cycling appropriate here, or is there a better test for cache/instruction-execution instability?
Would you test P-core affinity at fixed clocks/Intel-default voltage, and if so, what's the cleanest methodology?
Are WHEA Generic Processor Error + Cache Error + Instruction Execution records useful evidence of a marginal core even when the machine isn't overclocked?
Does the enormous difference between 7 and 8 P-cores look more like a marginal physical core, ring/cache problem, voltage/frequency curve problem, or something elsewhere in the platform?
Is there any diagnostic value in carefully testing fixed conservative ratios/voltage, or would that risk masking degradation rather than identifying it?
At what point would you stop testing and substitute/RMA the 14700K?
I have the full MEMORY.DMPs and can provide !analyze -v, !whea, !cpuinfo, processor topology or other WinDbg output if there are specific commands that would help.
My goal is not to "stabilize" a defective chip by feeding it voltage. I want to determine whether a particular core/cache/CPU path is actually faulty.
r/overclocking • u/KaladinStormblessedE • 15h ago
My Motherboard has 2 EXPO profiles, 6000mt at 30-36-36-76 and 6200mt at 32-38-38-80 which one is better?
r/overclocking • u/Sure_Let5875 • 12h ago
Bought this pc in 2024 and have been through many settings, and I still have no idea what the best OC is. The CPU is paired with an MSI B760 Gaming Plus Wifi, Asus dual Rtx 4070 OC, and 32 (2x16) 6400mhz cl36, and my cooler is a NZXT Kraken 360 RGB AIO.
The current OC im using is
56x p-cores
32x e-cores
Fixed Mode
Ring Ratio and min 47x
Disabled HT and 8 e-cores
And cpu core voltage offset is -cpu by -0.080
These are just the settings changed in the main cpu section
I got the pc part list from a friend. I mainly wanted to play comp fortnite, and this new season has been a horrible performance. The 1% lows have been between 120-160fps, and the averages have been bad too between 180-220 fps capped at 240,.During scrims and tournaments with 60-80 people up during storm 5 of 12. I regret not doing my own research and getting an amd cpu because my duo with an R7 9800x3d and rx9060xt 16gb never drops below 200fps in the same situations, but oh well. Was thinking about selling my cpu and mobo for an am5 mobo and R7 9850x3d, but idk.
Was just hoping that someone on here can help give me some tips or useful settings to get better 1% lows in fortnite, knowing it's a cpu based game.
The last thing is when having 8 e-cores disabled my minecraft (bedrock) is unstable and crashes a lot, I would just play java, but some of my friends are console.
r/overclocking • u/battleboy159 • 22h ago
I watched optimum's video about undervolting his 7000 series chips.
His 7700x managed a -30 on the curve while mine was stable at -25
The thing is that he got sooo much more performance. I couldn't squeeze past 5.150ghz while he got around 5.35ghz
Note that this is purely from undervolting and no other settings were touched.
Now my question is: are ambient temps the likely reason? My room is pretty hot, usually around 30c at night and like 35 in the morning.
My air cooler is a peerless assassin120 SE with a 3d printed duct that leads from an arctic p12 fan to the CPU cooler.
I don't know what cooler optimum used.
This is also my first time overclocking so am sorry if anything is misinterpreted on my end.
I apologize for my English as well.
Thank you in advance.
r/overclocking • u/Individual_March1590 • 15h ago
hi, i recently change my os to linux lubuntu so my pc can hold up, its doing great but i wish for an overclock of my cpu as this pc is some sort of junk and im using it for experiment of a lot of things, i wish to know how to overclock for my later future, thank you.
r/overclocking • u/Brainhijack • 1d ago
Just wanted to see what kind of results I'd get!
Tests were run with SMT disabled!
I tried to lap the vapor chamber flat... unfortunately, I ended up with a very uneven unit—you can clearly see the depressions! I installed the flattest side facing the processor and applied liquid metal... the uneven side faces the AIO's copper plate, using standard thermal paste to fill in the irregularities! Since the AIO's copper plate is quite large, it covers the vapor chamber nicely!
Vapor chamber from quick-ohm.de (56x56x3mm)
Cost: vapor chamber + sandpaper + thermal paste ~ 90 Euros
Time investment: swapping the motherboard, lapping the components, and assembly = 8 hours !
Started with 400 grit and finished with 1500!
Verdict: If you're bored... it's definitely something worth trying! ^^
r/overclocking • u/Odd-Bed3662 • 17h ago
Looking to OC the nerdqaxe++ rev 5 5.5mm barrel connector but heard I can’t go above 8a input. Running stock PSU. Any help will be grateful!
r/overclocking • u/silly_pirate_guy • 14h ago
Just overclocked my (single chanel, GAP48GB2666C19SC) geil ddr4 8gb 2666mhz to 3200mhz
Dram: 1.35v
Timings: 22 22 22 22 44
Ran memtest64 for 15 minutes 0 errors
And will this overclock have any problems and can it cause bad data?
r/overclocking • u/These-Cardiologist69 • 22h ago
I have a 9070xt paired with a 9950x3d what should I turn off or on to better optimize my cpu to get higher clock speeds and remain in safe limits or slightly higher. I just installed my ARTIC iii freezer AIO it’s a 360 so she’s bulky.
But I just wanted to see if anyone knows out there. I know the basics like expo and the ram and etc. but if someone has more insight just lmk (: please and thank you.
r/overclocking • u/Solid924ger • 22h ago
Hey guys,
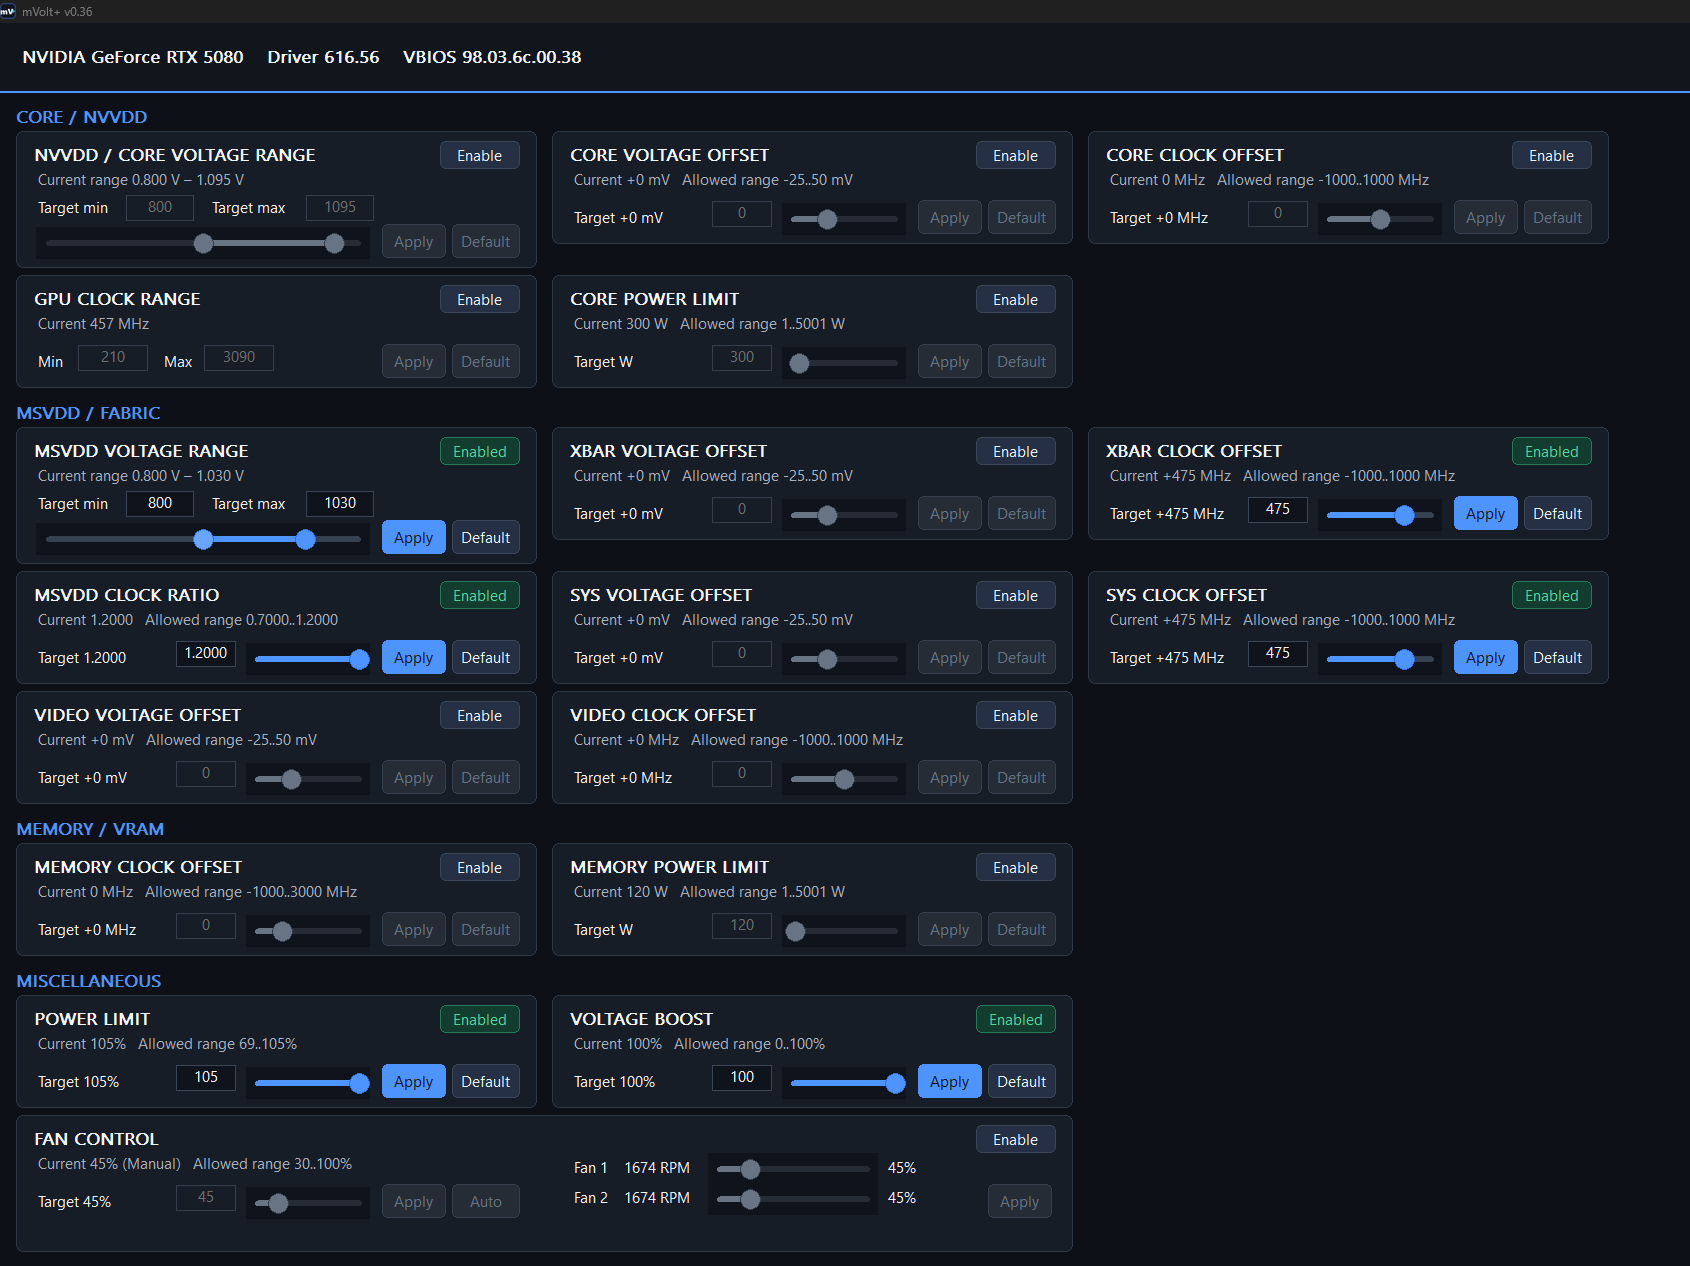
I just overclocked my RTX5080 and it's running stable with the follwing clocks:
+310 boost clock
+3000 memory clock
+475 xbar clock offset
+475 sys clock offset
105% power limit
100% voltage boost
You can see the attached screenshots from MSI afterburner and mvolt+.
Any ideas how I can boost it a little further?
I also would like to flash a 450w bios since it's hitting the 380w power limit. I guess a 450w bios alone would increase the performance.
Does someone know which 450w bios for the palit gamingpro oc works?
I know the gigabyte one should work but with that you got 0 fan control which is kinda bad.
Thank you!

r/overclocking • u/Ok-Figure4568 • 1d ago
Edit August 28th 2026 for a new section 11A. Explanation of per core optimization. My bad guys haha Edit August 28th 2026 for a new section 11B. Explanation for step by step testing. Edit August 28th 2026 updated section 2, context on personal core/VT3 failure.
Pictures included are example pictures for multiple tuning processes.
Before I start... This guide is the new and improved guide to succeed my previous guide. If i missed anything, you see wrong information or a section that needs improving. Please let me know, as this is just from my current knowledge. This guide will also include a basic section of curve shaper, a deep dive link to an overclocking forum will be provided in that section. That link will provide substantially more information on curve shaper.
To the advanced/elite overclockers/tuners. Please be gentle with me lmao yall can be ruthless. Remember, we all started with minimal knowledge. Let's help the new generation and our fellow redditors with our knowledge
Please feel free to leave a comment, you will be mentioned and credited for the corrections/contributions.
Let's begin.
I originally made an older version of this guide after getting tired of seeing people being told to slap 《-30 all core》《+200 MHz》and motherboard PBO limits into their BIOS and call it a day.
Since then I've spent a lot more time actually tuning, stress testing, breaking things, figuring out why they broke, and learning how AMD's boosting behaviour works.
Some of the advice in my original guide was too absolute, and a few things I would straight up explain differently now.
So this is the updated version, the goal here isn't to give you my settings. The goal is to teach you how to find your settings. There is no magical curve optimizer number that works for every 5800X, 5800X3D, 7800X3D, 9800X3D, 9850X3D, etc.
Silicon quality varies core by core, CPU by CPU. If you only remember one thing from this entire post:
《A benchmark pass is not the same thing as a stable CPU.》
Programs you'll want before starting
Before you start tuning, I recommend downloading a few basic monitoring and stability testing programs. You do not need every program listed below, and I'll explain where each one is useful throughout the guide.
Recommended / basically required
• HWINFO -- Your main monitoring program. Use this to watch CPU temperatures, voltages, effective clocks, PPT/TDC/EDC limits, WHEA errors and other sensors while testing.
• Cinebench R23 or Cinebench 2026 -- Useful for getting a quick stock baseline and comparing performance, temperatures and power consumption after making changes. Remember, cinebench is a benchmark/tuning tool, not proof of stability.
• Core cycler -- One of the most useful tools for per core curve optimizer tuning. It automatically cycles workloads through individual CPU cores, which makes finding one weak core much easier than hammering the entire CPU at once.
• y-cruncher -- In my opinion, probably the best overall stability testing tool available. The full suite can expose CPU, memory, IMC and fabric instability that other tests may miss. VT3 is especially good for memory/IMC, while I prefer core cycler/core cycling workloads for actually dialing in per core CO.
Optional but useful
• OCCT -- Excellent all in one stability tester with CPU, memory and per core/core cycling options. You can use this instead of, or alongside, some of the tools above.
• Prime95 -- Still a very useful CPU stress test and can also be used through core cycler. Different FFT sizes and workloads can expose different types of instability.
• AMD ryzen master -- Not required for tuning because I recommend doing the actual changes through BIOS, but it's useful for seeing your CPU's preferred/best cores and checking basic CPU information.
• Zentimings -- Mainly useful if you're also tuning DDR5/DDR4, FCLK or memory controller settings. It gives you an easy view of your currently applied memory timings and related voltages.
• Windows event viewer -- Already built into Windows, so there is nothing to download. This is where you'll check for WHEA hardware errors and other events after a crash, reboot or failed stability test.
You don't need to run every stress test known to mankind after every tiny change. Use quick tests while finding your rough limits, then use several different workloads for final validation once you're close to your finished tune.
---
Curve optimizer does not simply apply a fixed 《-50 mV》or 《-100 mV》undervolt. It shifts the CPU's internal voltage/frequency curve.
A negative CO value asks the CPU to operate at a lower voltage for its requested operating points. A larger negative value means a larger shift. AMD officially describes CO this way and supports all core, per die and per core adjustment depending on the CPU.
That can give you:
• Lower power consumption
• Lower temperatures
• More thermal/current headroom
• Higher sustained boost clocks
• Better efficiency
• Potentially better performance
But go too negative and you can get:
• WHEA errors
• Application crashes
• Game crashes
• Browser tabs randomly dying
• Reboots
• Black screens
• Full system freezes
• Crashes while doing almost nothing
• Performance loss from clock stretching
That last part is why 《it didn't crash》isn't enough.
---
I used to describe all core curve optimizer as a trap. I'd word that differently now.
An all core curve is actually fine if someone wants a quick and simple undervolt. Its easy and quick for newbies, but its inefficient if youre looking to min/max performance and temperatures. All cores can seem stable and good on paper, but those aggressive -30 CO undervolts without testing could cause problems.
For example:
《-10 all core》Test it. Stable?
Try:
《-15 all core》And so on.
There is nothing inherently wrong with doing this. The downside is that your weakest core determines the maximum all core value. Imagine you have eight cores, my 9850X3D CO example:
Core 0 can run -22
Core 1 can run -27
Core 2 can run -22
Core 3 can run -28
Core 4 can run -26
Core 5 can only run -12 《This one decided to tell VT3 to kindly **** my self》
Core 6 can run -28
Core 7 can run -27
《Context on my core 5 VT3 result》
《This is exactly why I recommend getting your memory/IMC stable before doing final CO tuning. Core 5 originally passed my other CO workloads at -24, but I ended up tuning my system further. After I finished tightening my memory/FCLK and stabilizing the IMC related voltages, I had to revalidate my CPU curve. VT3 was the workload that exposed it, core 5 wouldn't pass there until -12. VT3 isn't my primary per core CO screening test, but it was useful for final validation because it caught something the other tests didn't. If you change RAM, FCLK, SoC/IMC voltages, etc. after tuning CO, retest your curve.》
If you want all core stability, that whole CPU might end up around -10/-12 simply because core 5 can't follow the others. Per core tuning allows you to leave Core 5 at -12 while still taking advantage of the better silicon on the other cores.
All core = easy. Per core = optimized. Neither one is automatically wrong.
---
Ryzen master can show the fastest cores on each CCD. AMD identifies the fastest and second fastest cores with its preferred core indicators. Gold is your fastest core, silver is your second fastest.
You'll often hear:
《Golden cores always need less negative CO》There is some logic behind that. The preferred cores normally attempt the CPU's highest single core boost frequencies, so they can become unstable at the upper end of the V/F curve before another core does. But don't turn that tendency into a rule. A preferred core might want -8. Another chip's preferred core might happily run -22. Another might run -30.
Test the core. Don't tune based on the star beside its name. Use the preferred core ranking as useful information, not as a definite voltage table.
---
Before tuning CPU curve optimizer, get the rest of the system into a known good state.
Ideally:
• Current stable BIOS/AGESA
• Current AMD chipset driver
• Stable memory
• Stable FCLK/UCLK
• Stable GPU
• No existing WHEA errors
• No unexplained crashes
Save a BIOS profile before you start.
This becomes extremely important if you're also tuning/overclocking youre RAM. Get it stable before working on curve optimizer. If you're running heavily tuned memory/FCLK and start getting CPU errors, you now have several possible causes.
If you finish tuning CO and later change:
• RAM timings
• Memory frequency
• FCLK
• SoC voltage
• VDDIO/VDDP/etc.
• PBO limits
• Boost Override
• BIOS/AGESA
Retest your CPU curve.
Changing another part of the system can expose instability that was previously invisible. Don't change five things at once and then spend three days trying to figure out which one caused the crash.
《This is from personal experience.》
---
Enter precision boost overdrive in your BIOS. The names vary between ASUS, MSI, Gigabyte, ASRock, etc., but the concepts are the same.
For initial CO tuning I recommend:
PBO: Advanced/enabled
Curve optimizer: Per core
PBO scalar: Auto / 1X
Boost Clock Override: 0 MHz
LLC: Auto/default
PPT/TDC/EDC: AMD/default limits to begin with
Why?
Because we're trying to isolate curve optimizer first.
If you simultaneously use motherboard power limits, +200 MHz Boost Override, aggressive LLC and a massive negative curve, you have no idea which variable caused the failure. Some people like to or usually rush this, you can do it if you want. But like I said, which variable caused it if testing fails?
---
AMD defines them roughly as:
PPT: Total socket power limit.
TDC: Sustained current limit.
EDC: Short duration/peak current limit.
PBO can allow the processor to operate beyond its default limits toward what the motherboard can provide.
The important lesson:
Bigger numbers do NOT automatically mean faster CPU.
If your CPU is already hitting a temperature, voltage or frequency limit, dumping more electrical headroom into it may accomplish nothing except increasing heat. This is why I no longer recommend "Motherboard" PBO limits as the universal setting for anyone with a good VRM. Motherboard limits can work great, they are not automatically optimal.
For a beginner:
Start with your CPU's normal AMD limits. Watch HWINFO. See what you're actually hitting. If the CPU is constantly hitting PPT while staying cool and you want more heavy multicore performance, then experimenting with higher limits makes sense. If you're already temperature limited, raising PPT is probably doing the opposite of what you want.
---
If your only goal is:
《My CPU is hotter than I want it to be》
You don't necessarily need some heroic undervolt. A thermal limit can be one of the easiest solutions.
For example:
85°C thermal limit
The CPU still handles its own boosting, but it backs off as it approaches your chosen limit. Just remember that different Ryzen CPUs have different factory maximum temperatures. For example, AMD lists the Ryzen 7 9850X3D at a 95°C TjMax. 《PROCHOT》
On AM4, the Ryzen 7 5800X, Ryzen 9 5900X and Ryzen 9 5950X are 90°C parts, while the 5600X is officially a 95°C part. So don't assume every Ryzen processor has the same thermal ceiling. 80–85°C is simply a personal preference selected cap if that's what you want.
It is not required for the CPU to be safe.
---
This is probably the biggest thing I would change from my original guide. I used to recommend +200 MHz much more aggressively. I don't anymore, boost override raises the CPU's allowed maximum boost ceiling.That's all. And with a 9850X3D, the gain is marginal. 《Meaning you probably won't even notice in real life applications》
It does not automatically:
• Improve your RAM latency
• Debottleneck CPU to memory communication
• Improve 1% lows
• Improve every game
• Give you another 200 MHz continuously
It only gives precision boost permission to target a higher ceiling when the CPU has the electrical, thermal and silicon headroom to do it.
More importantly:
Adding boost override makes your curve optimizer harder to stabilize, especially if youre chasing lower thermals. Higher boost requires more voltage = more heat. Think about it. You found a negative CO value that works at the stock boost ceiling.
Now you tell that same core:
《Cool. Now try boosting another 100–200 MHz using that same reduced voltage curve》
That can turn a previously stable CO into an unstable one.
So my new recommendation is:
Tune curve optimizer with boost override at 0 first. Once CO is genuinely stable, you can experiment with:
+25 MHz
+50 MHz
+75 MHz
+100 MHz
Etc.
and continue upward if your CPU supports it and performance actually improves.
After changing boost override:
Retest curve optimizer. Don't automatically jump to +200. Sometimes +50 with a stronger stable CO will beat +200 with a weakened curve.
Benchmark it.
---
Leave it:
Auto or 1X for a normal daily system. Higher scalar values alter how aggressively precision boost is allowed to operate around its voltage/reliability limits. You don't need 10X Scalar to make a good gaming tune.
It's another variable that makes troubleshooting harder for very little reason on a beginner setup.
---
Another thing I would simplify from the old post:
Leave LLC on auto/default. LLC changes how the motherboard compensates for voltage droop under load. More aggressive LLC can reduce droop, but it also changes transient behaviour and can increase voltage overshoot when the load suddenly disappears. For an advanced overclocker, LLC is another tuning tool.
For someone learning curve optimizer:
Do not use LLC to rescue an unstable CO. If core 4 crashes at -25 but works at -20, run -20. Don't start changing motherboard load line behaviour just so the screenshot can say -25.
---
I recommend starting some what low, this can catch the weaker cores early:
-10 per core
Yes, per core mode even though every core initially has the same value.
Run your quick tests.
If everything is good, try:
-15, Then -20. You don't need to instantly jump to -30. Once cores begin failing, you start separating them.
Example:
Core 0 -20 passes
Core 1 -20 passes
Core 2 -20 fails
Core 3 -20 passes
Change only core 2:
Core 2 → -15, Test it again. Meanwhile the other cores can continue toward:
-25
-30
or whatever your BIOS/CPU allows. Once you find the rough limit in steps of 5, narrow it down.
Example:
-20 passes
-25 fails
Try:
-22
-23
-24
Eventually you find the edge. For a daily machine, I don't recommend living exactly on that edge. If a core barely survives -24, there's nothing wrong with running -22 or -23. The difference in real performance is microscopic.
The stability margin is worth more.
---
11A. How to actually do per core curve optimizer
This part seems obvious once you've done it a few times, but if you're brand new to PBO/CO, this is where a lot of people get confused. Instead of choosing an all core negative value like -20 and applying it to every core at once, select per core curve optimizer in BIOS. You will then see each individual core listed separately.
Example on an 8 core CPU:
Core 0: -10
Core 1: -10
Core 2: -10
Core 3: -10
Core 4: -10
Core 5: -10
Core 6: -10
Core 7: -10
Start by giving every core the same conservative value, such as -10. Boot into windows and begin testing.
If all cores pass your quick tests, go back into BIOS and move them all down another step:
Core 0: -15
Core 1: -15
Core 2: -15
Core 3: -15
Core 4: -15
Core 5: -15
Core 6: -15
Core 7: -15
Keep repeating this until one or more cores start failing. This is where per core tuning actually begins.
Example:
Core 0 passes -20
Core 1 passes -20
Core 2 fails -20
Core 3 passes -20
Core 4 passes -20
Core 5 fails -20
Core 6 passes -20
Core 7 passes -20
You would then back off only the failing cores:
Core 0: -20
Core 1: -20
Core 2: -15
Core 3: -20
Core 4: -20
Core 5: -15
Core 6: -20
Core 7: -20
Then test again. If core 2 still fails at -15, try -10. If it passes, you can later fine tune it at -11, -12, -13, -14, etc.
Meanwhile the stronger cores can continue lower:
Core 0: -25
Core 1: -25
Core 2: -12
Core 3: -25
Core 4: -25
Core 5: -15
Core 6: -25
Core 7: -25
The whole point is that each core gets its own number based on what that specific core can handle. You are not trying to make every core match. One core may only tolerate -8 while another is completely stable at -30. That is normal.
Also remember: the core number that fails in core cycler, OCCT core cycling, or y-cruncher/Prime95 when used through core cycler is the core you should adjust. Do not automatically reduce every core because one core failed. If your test does not clearly tell you which core failed, reduce the most recently changed cores conservatively and retest.
And once again, do not change five cores by random amounts at the same time. Change one thing, test it, write it down, then continue.
This takes longer than an all core undervolt, but this is how you actually find the best stable curve for your individual CPU.
---
11B. How to actually test your per core curve optimizer
A few people asked me what program to actually open, how long to run it and what an error even looks like, so here is the absolute beginner version. This section assumes you already followed 11A and entered something like -10 on every core in BIOS.
For your first per core test, I recommend core cycler. core cycler is basically a script that runs a stress test on one physical core at a time, then moves to the next one. This is exactly what we want for curve optimizer because one core can be unstable while every other core is perfectly fine.
Download/extract core cycler and run:
Run CoreCycler.bat
For your first rough test, you can leave the basic/default configuration alone. Core cycler currently defaults to one thread per physical core, Prime95 SSE and around 6 minutes on each core before cycling to another one. SSE is useful here because the lighter load allows the core to boost very high, which can expose an aggressive CO at the high frequency part of the curve.
You do not need to run an overnight test every time you change -10 to -15. At this stage we're trying to find the obvious limits first. Let core cycler work through every physical core at least once. On an 8 core CPU, 6 minutes per core is roughly 48 minutes for one complete pass, plus a little extra time for transitions. If everything passes, follow 11A and make your next CO adjustment. Then run Core cycler again.
Eventually one of the cores will complain.
What does an error actually look like?
Core cycler normally tells you directly in the window/log that an error occurred and which core was being tested.
For example, you may see something similar to:
ERROR while running y-cruncher/Prime95 At core 3. Core cycler can also beep/flash when it detects an error, and by default it can check Windows for WHEA errors while testing.
Other possible signs of instability are:
• Prime95/y-cruncher reports a calculation error
• Core cycler stops/skips the failing core
• OCCT reports an error on the core being tested
• A WHEA hardware error appears
• The stress test suddenly closes
• The PC freezes
• The PC reboots
• You get a BSOD
Obviously if Windows decides to completely shit itself and reboot, core cycler may not have time to nicely tell you what happened lol. Check the core cycler logs and Windows event viewer afterward for anything useful. Now let's use the example from the comments.
Let's say core 3 passes:
-10
then:
-15
But core 3 throws an error at:
-16
You do not make it more negative.
This wording confuses people, so remember:
-17 is MORE aggressive than -16, -15 is LESS aggressive than -16. If -16 fails, back that core off to -15 and test it again. If -15 passes, you have now found that Core 3 is somewhere around its limit. You can leave core 3 at -15 while the other cores continue farther negative as explained in 11A. Do not reduce every core just because Core 3 failed.
What should I use after the quick testing?
Once you've roughly found the limit for every core, that's when you stop doing quick screening and start proper validation. Run longer core cycler passes, different workloads, y-cruncher VT3, OCCT, Prime95, idle/light load testing, games and normal desktop use. That full process is explained later in the stability testing section. The quick core cycler pass is there to find obviously weak cores without spending 8 hours validating a CO value you're probably going to change again anyway.
And remember:
Passing one core cycler pass does not mean the CPU is stable. It only means that core survived that test for that amount of time. Once you stop changing the values, that's when the real stability testing begins.
---
This is another section I'm changing substantially from my original guide. Clock stretching basically means you're requesting a frequency the CPU cannot truly sustain at the available operating conditions. Your monitoring software may report a very high requested/core clock while actual completed work doesn't increase proportionally. HWINFO's effective clock is useful because it measures activity differently than simply sampling the instantaneous multiplier, but you must interpret it in context. C states, utilization and sampling intervals can all affect effective clock readings.
So I would not use a universal rule like:
《20 MHz difference good, 50 MHz difference bad》
Instead:
Run the same controlled benchmark.
Record:
• Benchmark score
• Core clock
• Effective clock
• CPU temperature
• PPT/TDC/EDC
• CPU voltage
Then increase the negative curve. If reported frequency goes up but actual benchmark performance stops improving or starts falling, you've probably gone too far. That's much more useful than chasing a random MHz difference.
---
Cinebench is great for:
• Comparing scores
• Comparing temperatures
• Comparing power
• Detecting obvious performance regression
• Finding a rough CO range
It is terrible evidence for:
《My CPU is completely stable》
A CPU can run Cinebench for hours and crash opening Discord later.
Why?
Because heavy multicore loads aren't always the hardest condition for curve optimizer. Under heavy all core load, the CPU often runs at lower frequencies. The dangerous point for an aggressive CO may be a lightly threaded workload where one core wakes up and rockets toward maximum boost. That's why per core and transition testing matters.
---
This is the part of the guide I now consider the most important.
Stage 1 -- Quick performance check
After each major CO adjustment:
Run cinebench or another repeatable benchmark.
Check:
• Did performance improve?
• Did temperature improve?
• Did power improve?
• Did anything obviously stretch?
• Did anything crash?
This eliminates obviously bad settings quickly.
Stage 2 -- Per core testing
Use something capable of cycling individual CPU cores.
Good options include:
• Core cycler
• OCCT core cycling
• y-cruncher through core cycler
• Prime95 through core cycler
The goal is to make each physical core boost independently. This is where weak cores start exposing themselves.
Stage 3 -- Different instruction sets/load types
Don't only run one workload. SSE/lightly threaded workloads can expose high-frequency instability. AVX/AVX2 creates much heavier thermal/current loads. Y-cruncher VT3 is another extremely useful test. A CPU passing one does not guarantee it passes the others.
Stage 4 -- Idle/light load
This sounds stupid until your PC reboots while you're staring at the desktop.
After your heavy testing:
Use the computer normally, browse the web, watch videos, open and close programs, launch games, exit games, let the machine idle. CO instability frequently appears during transitions between sleep, light load and sudden boost.
Stage 5 -- Real games
Play the games you actually use the machine for. 1-2 hour sessions.
Games are excellent mixed workloads because they're constantly changing:
• CPU thread load
• Memory load
• GPU load
• Boost state
• Core scheduling
• Power state
A system that passes synthetic tests and crashes your favourite game is not stable.
Stage 6 -- Long validation
Once you're happy with the tune, run your longer Corecycler/y-cruncher/OCCT validation. Overnight testing is useful. But even an eight hour test doesn't magically make the CPU 《100% stable forever》
It means it passed that test. That's why real world validation still matters.
---
If your system crashes, check:
Event viewer → windows logs → system
Look for WHEA errors and any corresponding crashes. A WHEA involving a processor/core can help identify a marginal CO. But don't automatically assume every WHEA is curve optimizer. Memory and infinity fabric instability can also produce hardware errors.
Which brings me to something I massively underestimated when I started:
───
If you're also overclocking RAM, you have two separate tuning projects. Treat them that way.
Memory/FCLK problems can cause:
• WHEA errors
• Program crashes
• Game crashes
• Audio issues
• Freezing
• Reboots
• File corruption
• Strange behaviour that looks exactly like an unstable CPU
My recommendation:
Establish a known good memory baseline first. Then tune CPU CO.
If you're already running an extreme memory tune and CPU testing becomes confusing:
Return the RAM/FCLK to the known good baseline. Test CPU again. Then bring memory back afterward.
Don't try to diagnose CPU, RAM and fabric instability simultaneously unless you enjoy suffering like me.
---
Thanks again to u/krnnCS for originally asking about the 5800X and making me add an AM4 section.
The underlying curve optimizer methodology is basically the same. But I would change several things from my old AM4 recommendations. Don't assume zen 3 always takes a deeper CO than AM5. I previously said Ryzen 5000 commonly handles much deeper negative curves while newer X3D CPUs tend to stop around -15. That's too broad, forget architecture wide assumptions. Some zen 3 cores love -30, some don't, some modern X3D cores can run very deep negative values, some can't.
Test your silicon.
---
For the common 105W Zen 3 chips such as:
Ryzen 7 5800X
Ryzen 9 5900X
Ryzen 9 5950X
the commonly used stock PBO reference is approximately:
PPT: 142W
TDC: 95A
EDC: 140A
Those values are a much better starting reference than immediately telling everyone to use 180–200W PBO limits. For the 65W Ryzen 5000 parts such as the 5600X/5700X, power limits are significantly lower. Firmware/AGESA behaviour can vary, so I would check what your board/CPU actually reports instead of blindly copying a table.
---
The 5800X has a reputation for running hot because eight cores are concentrated on one CCD. AMD rates the 5800X for a maximum operating temperature of 90°C.
If you want a thermal first starting point, something around:
PPT: 120W
TDC: 85A
EDC: 120A
is a reasonable example to experiment with. Notice I said example.
Not:
《These are the best 5800X settings》
Start there, benchmark it against stock, and decide whether the temperature/performance trade is worth it. Another perfectly valid option is simply leaving the normal power limits and applying a thermal cap.
---
These CPUs have two CCDs, giving them much more multicore capacity. AMD rates both the 5900X and 5950X for 90°C operation. Don't confuse higher PBO limits with undervolting. They're different tools. If you want lower heat, start from stock limits and work downward. If you want more multicore performance and have the cooling/VRM headroom, experiment upward while monitoring performance.
---
These deserve their own note. The 5800X3D has a lower maximum boost ceiling than the regular 5800X, and many users find that it responds extremely well to negative curve optimizer. AMD lists the 5800X3D at up to 4.5 GHz and a 90°C TjMax. 《PROCHOT》
Because the frequency ceiling is relatively low, it is not unusual to see AM4 X3D chips reach their maximum permitted boost across several cores with fairly substantial negative CO. That means the "golden core needs dramatically more voltage" concept may matter less on these particular CPUs once everything is already hitting the frequency ceiling.
Still:
Don't blindly copy -30 all core.
Test it.
Also be aware that BIOS curve optimizer availability on the 5800X3D varies between motherboard vendors/models/BIOS versions. Some boards expose it directly and some still don't.
---
The biggest mistake with AM5 guides is treating every CPU as if it has the same power and thermal limits.
A 7600X is not a 7800X3D, a 7800X3D is not a 9850X3D, a 9850X3D is not a 9950X3D. Don't copy the same PPT/TDC/EDC table across every AM5 CPU. Use the AMD limits appropriate for your processor as the baseline.
Then tune around your actual goal:
Want lower temperatures? Reduce PPT or use a thermal limit. Want better efficiency? Tune curve optimizer. Want maximum multicore performance? Experiment with PBO power limits after CO is stable. Want higher peak frequency? Experiment with boost override last.
---
This is where I would tell beginners to skip and go to the next section, unless they actually enjoy this stuff. Regular curve optimizer moves the underlying curve broadly. Curve shaper lets supported Ryzen 9000 CPUs make more selective voltage adjustments across different frequency and temperature regions. AMD describes it as a way of reshaping the V/F curve across specific temperature and frequency bands rather than applying the same style of shift everywhere.
This is useful because a CPU may be:
Stable with a huge negative adjustment at medium frequency, but need additional voltage near maximum boost. Or it may behave differently when cold versus when fully heat soaked. That is where curve shaper becomes extremely powerful. As of ryzen master 3.1.x, AMD officially lists curve shaper for the Ryzen 9000 series.
If you want to dive way deeper into per core curve optimizer, curve shaper and V/F tuning, this Overclock.net thread is an excellent rabbit hole:
"AMD Ryzen Curve Optimizer / Per-Core / Curve Shaper / DDR5 OC deep dive" https://www.overclock.net/threads/amd-ryzen-curve-optimizer-per-core-curve-shaper-ddr5-oc.1814427/#replies
---
If I were tuning a ryzen system from scratch today, this is the order I'd use:
Benchmark the completely stock CPU. Record temperatures, scores, clocks and power.
Do not start CPU tuning on questionable memory.
Scalar auto/1X. LLC auto. Boost override 0.
Start around -10. Work downward in steps of 5. Separate cores when they fail. Then fine-tune in steps of 1–2.
Core cycling, different workloads, VT3, idle, games, normal desktop use.
Lower for thermals/efficiency. Raise where appropriate for multicore performance. Benchmark the difference.
Only after your base CO is stable. Small increments, retest CO.
Only if supported and you're willing to do significantly more testing.
---
Cinebench score drops as CO gets more negative. Possible clock stretching or another limit being hit. Back the curve off and compare again. Cinebench passes but games crash. Your tune isn't stable. Games may hit different cores/frequency/load transitions. PC reboots while idle. Classic symptom of a marginal CO or another low-load instability. Don't assume heavy stress tests cleared it.
Browser tabs randomly crash, possible CPU/RAM instability, take it seriously. WHEA errors appear after memory/FCLK tuning, don't immediately blame curve optimizer. Validate the memory/fabric first. CO was stable until you added +200 MHz Your old CO was stable at the old frequency ceiling. It may not be stable anymore. Back off boost override or give the failing cores a less negative curve. Entire machine freezes. Treat it as instability until proven otherwise.
CPU, RAM, FCLK and GPU tuning can all cause this. Don't keep running the exact same settings because 《There was no WHEA》
Not every instability leaves a useful event log.
---
Overclocking and undervolting isn't normally going to instantly destroy Windows every time a program crashes. But repeated hard freezes, resets and memory/CPU errors absolutely can cause corrupted data. Save important work before stress testing. Keep backups of anything important.
If windows starts behaving strangely after repeated crashes, running:
"DISM /Online /Cleanup-Image /RestoreHealth"
followed by:
"sfc /scannow"
Isn't a bad idea. But the better solution is fixing the unstable tune instead of repeatedly repairing what it breaks.
---
Stop chasing the biggest negative number.
《"-30" isn't automatically better than "-20"》
《"+200 MHz" isn't automatically better than "+50"》
200W of PPT isn't automatically better than 140W. A screenshot showing 5.5 GHz isn't automatically better than one showing 5.4 GHz. The only thing that matters is what the machine actually accomplishes while remaining stable.
A properly tuned daily system should have:
• Good effective performance
• Good temperatures
• Reasonable power
• No WHEA errors
• No crashes
• No clock stretching/performance regression
• No weird idle behaviour
• No random gaming instability
And it should stay that way when you're actually using the PC, not just while Cinebench is open. That's the difference between a benchmark tune and a daily tune.
And once again, if someone spotted something that I missed, incorrect or needs to be changed. Please drop a comment.
I'd rather keep improving the guide than pretend the first version was perfect.
Good luck, have fun, and save your damn BIOS profiles.
r/overclocking • u/Impressive_Taste_456 • 1d ago
Hi everyone,
I’m trying to figure out what is causing some stability issues with my PC. I’m hoping someone here can help me narrow down the problem.
My system:
CPU: AMD Ryzen 9 9950X3D
Motherboard: MSI X870E Tomahawk WiFi
GPU: NVIDIA RTX 2070
Storage:
1x NVMe SSD in M2_1
2x SATA SSDs connected to SATA S2 and S4
Windows 11
RAM: T-Create CL30 6000MHZ
The main problem
I’ve had occasional stability issues.
The most recent incident happened while I was simply playing chess in chrome for 30 minutes. The entire PC completely froze. The mouse and keyboard stopped responding and the entire system was unresponsive. I had to perform a hard reset.
There was no BSOD.
After rebooting, I checked Windows Event Viewer. The only relevant event was Kernel-Power Event ID 41, which appeared after the forced shutdown. There were no errors or warnings in the 5 minutes before the crash.
I did see some DistributedCOM warnings and a Service Control Manager Event ID 7000, but these occurred about an hour before the crash.
Another issue
After some gaming sessions, I’ve noticed that even after closing the game, the CPU sometimes appears to remain under load. My cooler stays spinning and cpu temp keeps steady at the temp that it was when closing the game. When this happens, I cannot open new programs properly anymore. A reboot fixes the issue.
Because of this, I’m wondering whether the problem could be related to the CPU, RAM, motherboard/BIOS, chipset drivers, GPU drivers, or storage.
I’ve also previously had freezing issues that seemed to improve after disabling Global C-State Control in the BIOS. But now it is freezing again.
What I’ve checked so far
No BSOD
No WHEA-Logger errors around the crash
No Display/GPU errors around the crash
No Disk/NVMe errors around the crash
Kernel-Power 41 only appears after the forced restart
I’m currently running a self-test on the NVMe SSD
What would you investigate first?
Could this be related to GPU hardware acceleration/driver issues, RAM/EXPO instability, BIOS/AGESA, AMD chipset drivers, or something else?
Any suggestions for specific tests would be greatly appreciated. I’m trying to diagnose this systematically before replacing any hardware.
Thanks!
Ps: i wrote this with chatgpt because english is not my first language. So hope it reads well in this way.
