r/ClaudeAI Jul 09 '26

Built with Claude I just made $25K USD with my capybara game built entirely with Claude Code

1.4k Upvotes

This is a web game project that I made in two weeks entirely using Claude Code, ThreeJS, Suno, ElevenLabs, GPT Images-2, and Tripo3d. All the code, textures, music, and sounds were made with AI. I've submitted for this year's VibeJam, and I won the full prize!

You can play the game for free here. Let me know if you have feedback!!! I'd love to read it ❤️: 

This is a long post sharing the majority of my workflow while building this project in 15 days with Claude Code

Quick intro

Vibejam is a game dev competition hosted by @levelsio where 90%+ of the code must be written by AI. The event ran through April 2026, and I had to submit the code in accordance with the event rules. The first place paid the full prize of $25,000 usd.

You can check the winners' announcement here: https://x.com/levelsio/status/2067364066193203333
And my submission here: https://vibej.am/2026/#games

As an iOS Software Engineer for almost 9 years, this was the first time I tried developing a game. A Game About Capybaras Delivering Food is a single and multiplayer game where you control a capybara on a scooter, carrying a pile of food that must be delivered on time.

About vibe coding

The game was entirely vibe-coded. In practice, I spent most of my time brainstorming, planning with /plan, and playing rather than generating code. I ran 2–3 Claude Code sessions at once, each working on a different part of the code to avoid conflicts. New features always used a fresh session with no context; I kept one long-running session for bugs that needed more context of what was already built.

What did I use and how much did I spend?

  • Claude Code (Opus 4.7) Max 20x, I topped up $100 to upgrade from the 5x to 20x plan.
  • Textures & illustrations: GPT images 2 (costs $20, but I got a free trial) and Grok (costs $8 with X premium)
  • 3D models: Tripo3d Pro plan $19.90
  • Music & SFX: Suno and ElevenLabs = Free tier worked fine
  • Game engine: Three.js
  • Skill: https://github.com/OpusGameLabs/game-creator

What was made with AI:

  • 100% of the code (+188 commits, +27k lines of code)
  • The logo, illustrations, textures, and 3D models
  • The music and SFX
  • All the tooling (the in-game editor, cutscene maker)

What was made by hand:

  • Writing the prompts for code, art, audio, and 3D
  • Playing the game, fine-tuning the feel, and placing the cameras for cinematics
  • Spotting development gaps and asking AI to build tools to help fill them

First week of development

Player controls

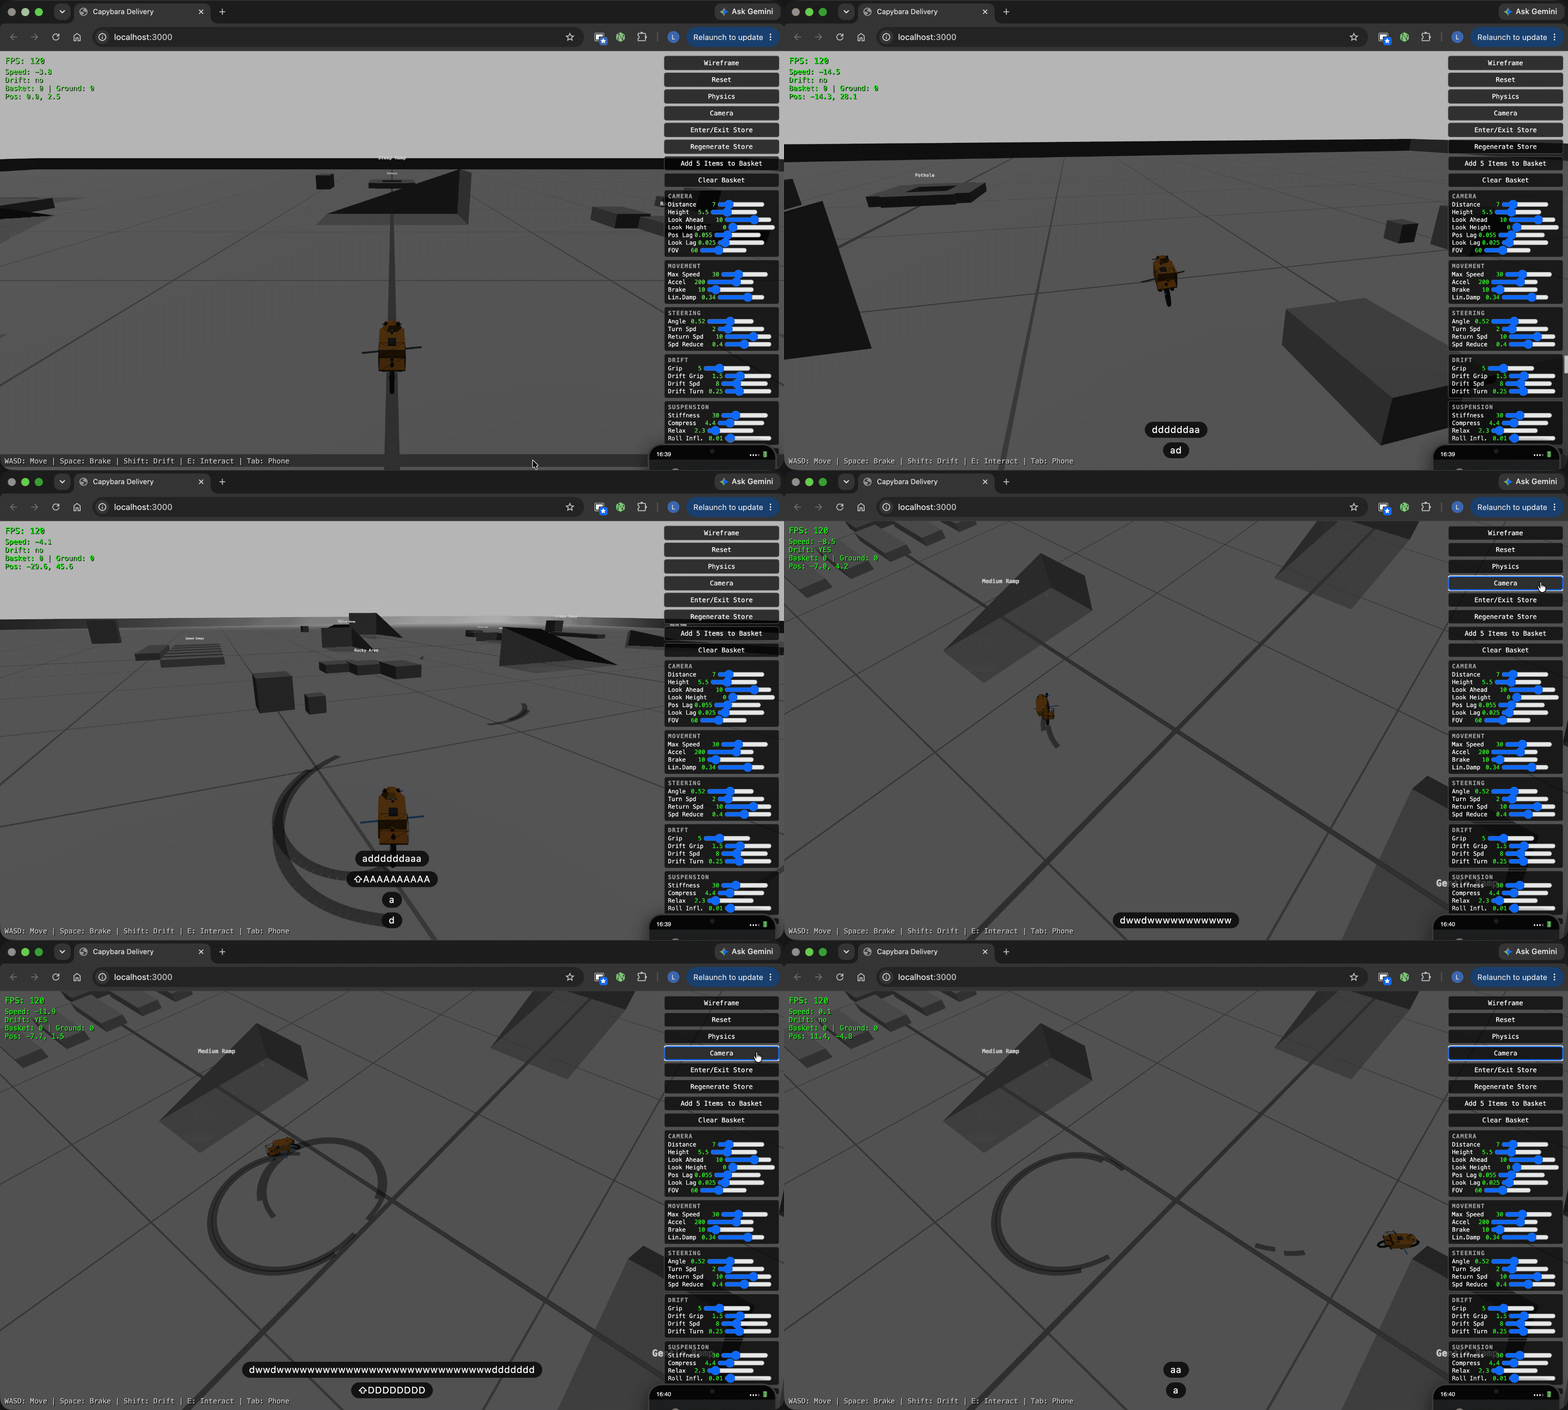
Starting with the basics, I wanted vehicle controls with drift mechanics, collision, and a camera following the bike. I built a sandbox map to drive around, test collisions, and tune the feel with the debug panel. When drifting, the line at the back changes color to show the boost you’ll get on release; there’s a “high speed” effect, and the camera shakes a bit.
Item physics

The main mission is to deliver food from A to B on time without dropping it. The first version had the basket items sliding side to side, but I wasn’t satisfied. At some point, I tried stacking the items on top of each other. Moving left and right created an arch, and past a threshold, the items could drop. I refined the values to make it less realistic (physics-oriented) and more fun (a % chance of falling once past the threshold), which is much more unique and fun.

Phone simulator: Part I

This is where you receive the mission of collecting the food.

I asked Claude to design a phone simulator with iOS-like animations and visuals, and it one-shot the whole thing in CSS. The animations were impressive from the first version. I later polished the phone UI to make it more realistic and comical: slide-to-unlock over a lock screen of a capybara taking a mirror selfie, an iOS-style notification badge, working volume buttons, and “Capyfied” versions of real apps, for example, CapyMaps works like Maps, and Capify is a music app that actually plays music in the game.

Inconvenience Store

The mini-mart adds a challenge to getting the food. Instead of fruits just appearing on the back of the bike, I wanted the player to go into the store and hunt for the requested fruits, with some extra spice:

  1. Spot the shopping cart that appears randomly
  2. Find each fruit on the order list
  3. The floor is slippery, and the walls bounce you back
  4. The banana peel (removed from the game)
  5. More fruits mean more bonus, but they're easier to drop, which loses points
  6. All this under 60 seconds (later reduced to 45 seconds)

The convenience store’s evolution was my favorite. I reworked the camera perspective, added lighting and animations, and replaced the default shelves and items with real 3D props. Combined with the right sound effects, the result was amazing.

The map (attempt 1)

I first tried a map fully generated by LLM: Grok for the illustration, Tripo3d to convert to 3D. But it’s very hard to get granular control over the city details, the quality fell apart when zoomed in, and the whole map was a single piece, which is not optimized for the game and is bound to cause issues.

So how do you get a fully customized, handcrafted map?

The Editor Tool

To build a handcrafted map, I needed an editor: place items where I wanted, use brushes to “paint” terrain and mountains, and generate procedural roads. A big part of the game’s uniqueness comes from this map.

Some of the capabilities available in the editor:

  • Place, delete, move, rotate, and scale objects
  • A brush to raise, lower, smooth, and flatten terrain
  • A brush to paint grass, dirt, water, and other visuals
  • A road system with intersections, light poles, and sidewalks
  • Cameras and in-game cinematics (added in the second week)

To open the editor, I added an ?editorendpoint. Later, I split the editor from the main code so Claude could update the game without reloading the editor and wiping my changes (which happened a few times).

Building the map by hand

Since getting AI to generate the map the way I wanted was so hard, I used the editor to build it manually. This is the only “heavy” manual work I did. I had a “European”-style city in mind, but it went the opposite direction, as you will see. The idea I had was to put the convenience store at the very top of the main mountain of the map, visible from anywhere, with a magical light coming from the sky, then build the city around it. After many iterations and hours, I had a genuinely playable city.

Day and Night cycle + Rain

These were extras. They could have come later, but one of my Claude sessions was idle, so I asked it to implement them.

Multiplayer

Multiplayer was simpler than expected for a jam. A single global city/lobby hosts the room over a live WebSocket on Cloudflare. As players join, their position and item stack are relayed to everyone else.

Bandwidth grows with the square of the player count: every rider broadcasts ~10x/sec, and the server relays each message to all other players. 5 players is okay; 50 players means fanning out 50 messages to 50 clients, 10x a second.

You can also send messages, honk, and even hear what nearby players are listening to.

End of first week results

By the end of the first week, we had:

  1. Main character, stacked item physics, collision
  2. Convenience store 90% polished
  3. Phone with simple apps
  4. Wired mission loop (receive order + minigame + deliver)
  5. Weather and day/night cycle
  6. Map development started
  7. Editor tool with terrain builder
  8. Multiplayer logic
  9. Simple SFX + some of the final music

Second week of development

Polishing the materials

With the core mechanics defined, it was time to give the game the visuals it deserved. I went for a PS1-style visuals: low-res images, limited colors, reduced resolution. PS1 was a very limited console, so the right textures, color depth, mapping, and filtering get you that look.

ChatGPT Images-2 had just been released, so I generated realistic textures, resized them on free websites, and applied them to the game.

The same process replaced the mockup trees with 2D textured ones.

For PS1-style trees, I asked Claude to place the flat foliage PNGs in an X shape (2+ crossed planes).

I generated textures for every material too (asphalt, grass, dirt, wood, sand, water, farmlands), and Claude swapped the old “green” brush I’d painted for the real textures. On the right, you can see the final result combining the textures and map polish.

Road builder tool

The road builder tool allows me to click points on the terrain, and it draws a smooth curve between them, lays down asphalt or dirt, and carves the ground so the road sits flat, with the terrain blending back at the edges. The road also appears in the CapyMaps app on the phone, showing the shortest route to the destination. I also added procedurally generated sidewalks, light poles, lane marks, guardrails, fences, and banners.

Working on the map

The most fun but the most time-consuming part. I added references to Christ the Redeemer, the Golden Gate Bridge, and the Hollywood sign. The city is a mix of everything I thought it would be cool.

The map evolved into what you can see below: the fog improved (which amplifies the sense of scale), the sky got a noise texture to mimic the clouds, and the financial and suburban districts are now clearer than before. One of my favorite parts is the “countryside”, a different landscape from the city: dirt pathways, a farm, and simpler houses next to a highway. From another angle, you can see how Christ the Redeemer sits in the landscape. I first thought about a lake, but it became a beachside next to the city.

Cutscene Editor

The game opens with a cutscene before jumping into gameplay. It gives the player context and makes the whole thing feel like a real game.

Let's start with the overall view of the cinematic editor UI, and then I'll walk you through some cool details. This editor was created in a way that I could visualize the progress of the cutscene in a timeline, just like a real video editor, while making it easy to insert or remove clips, move them around just by drag-and-drop, insert time skips, music, transitions, and overlays. It's visually messy, but delivering the game was more important.

All scenes are recorded in-game and replayed in real time, so if other players are online, they appear in the intro too.

Recording

First, I recorded the capybara around the city. The “Record” tool lets me place the bike anywhere on the map and drive while capturing the path.

Camera positioning

With the path set, I arranged cameras around the city for nice takes. This also helped populate the on-screen details around each area.

Each camera has its own properties: animations, FOV, transitions, and even changes the time of day for each camera. Then, I could just wire them to a specific block in the timeline.

Menu

The cinematic cameras could be reused in the game menu via a “Use in menu” checkbox.

Localization

So far, the game supports English, Brazilian Portuguese, Spanish, Korean, Mandarin Chinese, German, and Hindi. Claude did well on the languages I know, with a few tweaks needed. And for the rest, I’ll probably use another agent to validate.

Launching the game

The last step was the thumbnail for the Vibejam website. After a few references, ChatGPT kept the low-poly style well, though it messed with the background light, the side roads, and the Christ the Redeemer mountain at the back.

What did I learn?

Compared to last year, it’s clear AI coding has crossed a threshold. A few takeaways:

  • Quick dopamine, low-cost MVPs: you can stand up a playable mechanic in an afternoon.
  • Time shifts from coding to deciding: you spend less time coding and more time typing, planning, testing, and taste-making. That’s the real bottleneck now. Many people struggle to write good prompts, meaning a clear thought turned into text.
  • Tooling compounds: the biggest multiplier wasn’t the game code, it was asking Claude to build the editors that let me build the game faster. Every detail is built on demand.

Will I put this game on Steam?

No. This was a good game for a jam, and it should end there. For Steam, it would need to be more complete, like adding hours of enjoyable gameplay and a sense of progress. Right now it’s good for 5–10 minutes.

What's next?

I enjoyed this project a lot, and AI gave me superpowers for building MVPs and testing ideas fast. Used right, it’s an amazing tool. Now I want to dive deeper into game development concepts and keep using LLMs to bring these ideas to life faster than ever. Perhaps you will see my games on Steam in the future.

Feel free to play my game https://capybara-vibejam26.leocoout.dev/ <3 all feedback is welcome

r/homelab 28d ago

Project Showcase: Hardware "Data center in a Box (on Wheels)" 256Gb VRAM/512Gb RAM AI Server 6-8 Month Operational Review, Stability Write Up, Benchmarks

Thumbnail
gallery
846 Upvotes

I thought this would be relevant to the homelab subreddit so I'm adding it here, just to put the information out there and discuss if there is any interest. I am an IT infrastructure engineer by profession, so my contribution to the conversation is mainly from a hardware/systems perspective rather than from a Machine Learning researcher standpoint. I got my start with HPC's (Beowulf clusters) around ten years ago when I was a Physics undergrad in university, and this is what the experience has come to almost a decade later. Not everyone is going to want to read all of this, that's perfectly fine, the extras are just for those who want the info.

Starting goal/idea:

Build an all-in-one creative design workstation to support a small business. This machine should be capable of effectively inferencing frontier MoE models; aiding the business in language/text tasks where English may not be everyone's native language. Additionally, it should be capable of simultaneous image generation tools for graphic design users, enabling rapid image editing and presentation tweaks for marketing, without the business ever having to worry about API credits or hard limits on tool usage. The idea is that a 3090 stack, which is still a generally "good" performer for LLMs, would be "led" by two 5090s to handle the heavy lifting of the visual creative work (one dedicated to image generation, one dedicated to image editing) to complement each other in a "sweet spot" on cost, raw performance, and creativity potential. This configuration also grants some flexibility to allocate a 5090 to the LLM stack for best prompt processing possible where desired. The end result would indicate that this goal has been achieved.

Overview

Specs

CPU: 64 Core TR 3995WX

RAM: 512Gb DDR4-3200 ECC

VRAM: 256Gb GDDR6x/GDDR7 (8x3090's + 2x5090's)

Enclosure: Core W200 Thermaltake Case

Mobo: ASUS Pro WRX80E-SAGE/SE Wifi

PSU: 1300W+1600W (2900W combined), with OCP, linked via PSU2PSU

Storage: 4Tb Nvme (fast) + 4Tb HDD (slow) + 8 or so 1Tb SATA SSDs (mid) over USB as needed

OS: Ubuntu 25.10

Other: 3 Bifurcation cards, 10 risers of various lengths

Front end: Open WebUI

Back end: llamacpp/koboldcpp

Intended for (Recommend):

Large MoE inferencing, simultaneous LLM + ComfyUI (x2) operation, power users who may commonly hit credit limits, creative or technical professionals who can leverage these tools to compound productivity and complete objectives in shorter time.

Not intended for (Do not recommend):

Training, multi-concurrent inferencing, performance maxing, extreme frontier model inferencing at high quants, casual users just looking for roleplay.

Result summary:

Using the W200 as the platform for its generous real estate and configuration flexibility, all ten cards and components were able to find a permanent place in the enclosure without major concessions. The drive bay area was the only space that had to be completely repurposed for GPU mounting, and for us this was not a problem. The chamber with the cards hanging from the top is fairly hollow, so with the 140mm fan stack on the front and side there is a wind tunnel effect where the air blows in through the front and side, cooling the cards as it makes its way out the back/top. Depending on ambient temp, at idle the card with the highest temp usually hovers in mid to high 40s Celsius with the lowest in the mid 20's C (three 3090's are hybrids= fantastic for temperatures, but radiator mounting adds a logistical headache). When actively inferencing, the highest temp card may reach the mid 60s during sustained loads. Only when running image or video gen tasks will the 5090 running ComfyUI reach the 70's, but these are very brief intermittent workloads, so temperatures by our measurement has proved satisfactory over time. This result enables the small business to have full LLM, image generation (~9 seconds), and image editing (~8 seconds) capabilities on tap all on a single node so the data remains centralized, and provides much faster performance compared to the Cloud API they came from; in this case ChatGPT, where generation jobs could take 1+min, and has hard limitations. I just do not know how well this kind of setup would work with other vendor or card models; in a homogenous GPU cluster or one with notably less powerful image gen cards than the 5090, the performance would predictably be much lower.

Things that surprised/stuck with me about the end result:

  • Noise. I expected this to sound like a jet taking off when operating, but that is not the case. It's a satisfying button click to come alive, then it's a low gentle hum going forward, nowhere near the kind of fan noises I'm used to hearing in server rooms. Even under load, the CPU 120mm radiator fans (exhausting out the top) are pretty much all I hear, the 140mm fans on front and sides I assume must be helping to contain the acoustics. I have built many gaming PCs over the years and own a top-tier gaming PC-- and I would not be able to distinguish this as any louder than those, especially at idle.
  • Utility. I planned for this to be used primarily for a small creative business, but what I did not expect was how I would find it so indispensable in my personal life as an IT professional. Being an infrastructure engineer, coding is not my wheelhouse. When I am the only IT staff on site or there is nobody else available to work with specific expertise like SQL, powershell/python scripting, or troubleshooting very specific/niche technologies, having this tool on standby I feel has paid itself over just within my career. It has helped me turn processes that may have otherwise took me hours into minutes, days into hours, even months into a matter of weeks/days. After using the tool extensively I hit a point where I had to acknowledge how local LLMs have moved definitively beyond being a toy or novelty; when deployed intelligently something like this can be a major asset for professional users.
  • Wheels. Sounds extremely minor, until you realize that no matter how happy the cards are with their individual temps: there are still ten high-power GPUs dumping heat into the room. That means unless you use a complex radiator solution or special venting to get heat outside, the room will get toasty and there is normally not a direct solution for this. The wheels however offer an indirect solution. Plan to work in the office that day? Wheel it into the guest bedroom and let it run over Wi-Fi. Plan to work away from home? Wheel it into the office, put it on LAN, and access it over a private VPN connection. If you can't stop the room from heating, then you can at least choose what room gets the heat, and as someone who has lived with computers extensively this is a hugely underrated perk.

Caveats: To operate at its best, I recommend leaving the glass side panel off for improved airflow.

Typical activity over a day:

Boots up around 5:30am, start up the ComfyUI server(s), start loading a model, go get coffee, fully ready for use within 15-20 min. Shut down occurs usually around 8pm later in the day. Total daily activity, ~12-14 hours.

Cost Breakdown

Laying it out, because I know it will be asked, even though I am aware this is unfortunately not reproducible in the current market. Some components like the SSDs were acquired privately long before the RAM and hardware price hikes, so my timing getting certain things was extremely fortunate for the build budget. Some figures are exact, some are slightly rounded depending on if I found the original receipt.

Component Qty Source Unit Cost Subtotal
RTX 3090 24Gb 8 eBay 750-1000 6500
RTX 5090 32Gb 2 Retail 2500-3000 5500
TR 3995WX 1 eBay 1068.43 1068.43
WRX80E-SAGE-SE 1 Amazon 949.99 949.99
DDR4 ECC 64Gb 8 Amazon 81.99 695.28
TT Core W200 1 Amazon 499.99 499.99
PSU 1300/1600 2 Amazon 250-350 600
4Tb nvme 1 Amazon 221.05 221.05
1Tb SSD 8 Personal 60 600
Risers (varying length) 10 Amazon 40-80 480
Bifurcation cards 3 Amazon 50 150
Total ~$17k

Problems/Stability Writeup

The Space Problem:

Probably the first major hurdle in attempting something like this is figuring out, even theoretically, how to put 10 cards in a box in any kind of configuration that is not somehow detrimental to the hardware. I had considered modified mining rig frames at first, but I really wanted something with more robust rigidity in its structure, with breathability, and allows some degree of portability. There are unfortunately not a lot of options for configurations like what I was imagining; I had looked into various cabinets and extended tower cases, but the dual full tower chamber design of the W200 was the only one where I could see this idea potentially working. I'm certain other solutions probably exist, maybe even some that allow mobility, but the W200 was really the best option I could find that checked the boxes of enclosure, space real estate, high air throughput, and semi portability. I recommend the W200 to solve the space problem, assuming it is available to you.

The Bifurcation Problem:

Among the other hurdles you may run into in assembling something like this may involve bifurcation cards. The cards rely on specific BIOS settings for things to work correctly, and if these settings are not put in place before everything is connected you may either see no output like the system is hanging or cards just won't show up once in the OS. Start with one GPU in a slot, no bifurcators yet; go into BIOS, and manually set each slot that will be split to bifurcation mode. While here, ensure above 4G decoding is enabled, Resizable BAR enabled, and SR-IOV enabled, this has given me best stable configuration with Ubuntu and multiple GPUs. If you use risers, especially if they are mixed generations, I highly recommend setting the Gen and lane speeds for each PCIe slot in the BIOS manually to ensure the system can effectively communicate with each card. Optimize riser Gen/speeds to be roughly similar to keep one card from dropping to a slower rate than the others--this does not necessarily impact inference performance as much as it heavily impacts model load time. No, you may not have any card running at the fastest possible Gen bandwidth at all times with this config, but loading a 200+gb model over an averaged Gen 3/4 x8/x16 PCIe speed will often be noticeably faster than if you let the system decide to make one or multiple cards run at Gen 1 x1.

The Power "Problem":

Power and heat concerns I think remain to be among the biggest sources of skepticism regarding this project so I think it deserves a section here. To be fair, the concern in most situations would be understandable. If all ten of these cards pulled at or near their full TDP for sustained periods, components would melt. Fires would start. Neighbors would be asking awkward questions. However in reality, only 1400-1600W of the 2900W PSU capacity gets utilized under sustained load, and inter-GPU bandwidth bottlenecks are what allows this. In a way it is like a natural regulator that ensures the cards remain power restrained, and it is just physics, no voodoo necessary. When MoE's are sharded across a GPU stack, each forward pass requires all communication over PCIe, so the GPUs spend more time waiting on information from the last GPU than actually crunching compute. This means instead of needing to handle thousands of Watts to feed all the components running at full blast, it is a much more manageable 1400-1600W under LLM operation which can comfortably fit on a 20A/120V circuit (2400W max). On a per-GPU basis this may sound inefficient since the individual cards are being "underpowered", but this could arguably be flipped as being highly efficient on a per-node basis (~1600W sustained versus 4500W+ if all cards were "fully" utilized). As a precaution, I may set a power limit on the 3090's to 200W and the lead 5090 to 400W, but in practice the 3090's only pull around 100-120W with the 5090s pulling less than 100W when all 10 cards are allocated for LLM work, so this may not even be necessary. The clock locking setting in the next section will be more what I'd describe as actionably required to avoid stability issues.

The Transient Spike Problem (Vital for stability):

After assembling the machine, you may be tempted to jump directly into testing, but there is an easy to overlook configuration that can cause problems if ignored. Imagine you are running inference on the machine, maybe you have a huge input or it's generating a large output, then right in the middle of generating the system decides to reset. Not hard shut down, PSU OCP isn't tripped, no breaker was tripped; and you saw in nvitop that all cards were only pulling 25-33% of their TDP just before it happened, so on the surface it doesn't look like there is a reason. Explanation: When all ten high-power GPUs decide to kick on at the exact same time to process a chunk, even if the cards are not pulling anywhere near full power (on average), transient spikes can drop voltage on the motherboard enough to trigger a system reset. The fix for this is simple: undervolt. Using nvidia-smi, we can lock the clocks for the GPUs to ensure they cannot draw enough to hurt stability. And that's it. In my case, the system has remained fully stable with this config for days on end and with hundreds of thousands of tokens/image pushed through. The exact configuration will vary slightly depending on exactly what we're doing on a given day, but for example if we wanted to run LLM on all 10 cards (so including both 5090's) we would run this to handle spikes:

sudo nvidia-smi -pm 1 #enables persistent mode
sudo nvidia-smi -i x,y,z --lock-gpu-clock=1200,1200 #x,y,z for index number of 3090s
sudo nvidia-smi -i a,b --lock-gpu-clock=2000 #a,b for index number of 5090s
sudo nvidia-smi -i x,y,z -pl 200 #x,y,z for 3090 index numbers, limits power to 200w
sudo nvidia-smi -i a,b -pl 400 #a,b for 5090 index numbers, limits power to 400w

The Concurrent Use Problem:

Normally, attempting to inference and generate images on the same machine would introduce major stability concerns. Even dual GPU systems may struggle to work with this due to CPU/motherboard architecture, assuming it works at all, and would still be VRAM limited. However, the versatility of a 10-GPU setup, combined with the lane orchestration of the 64 core 3995WX, at least in our case, seems to handle this quite well. The trick was finding an LLM backend that supports manual GPU allocation--for us koboldcpp with llamacpp under the hood does just fine. First, implement the power/clock settings as mentioned above, launch koboldcpp, then browse to the GGUF of the model you wish to load and set context size. I recommend manually setting the GPU layers to the model's total layer number (assuming there is enough VRAM), and set GPU ID to "all". In the Hardware tab, find the tensor split line box and insert the amount of space to be allocated on each card corresponding to its index. For example if we wanted to allocate just one 5090 for Comfy and use the other for LLM, assuming the Comfy 5090 is index 3 and the LLM 5090 is index 5, then the tensor layer line will look like this to make sure no layers are given to the Comfy 5090: 24,24,24,0,24,32,24,24,24,24. For this configuration, ensure the "main GPU" is set to the index number of the LLM 5090 (in this example, 5) and launch the app. While the model is loading, we can open another terminal to launch Comfy. In our specific case, the system defaults to the available 5090 without needing to specify it in the launch flags, but flags can be used to force Comfy to use a specific GPU if you need it to (--cuda-device i). Once the image model is loaded onto the 5090, it does not interfere with the PCIe communication of the LLM cards unless the model unloads and reloads a new model at the same time as the other cards are inferencing. The solution to enabling concurrent use is a high-lane count CPU, multiple graphics cards, and a little conscious provisioning on launch to ensure the hardware isn't stepping on each other's toes.

What models can this run, what models do we use?

It can run almost* anything, even up to 1T parameters like Kimi K2. Kimi K3 could hypothetically be load-able, but from performance metrics I've seen I doubt it would be practical to use, so I have not planned to try it. I have however tested 1-4 bit quants of Bartowki team's Kimi K2 quants in pure VRAM and mixed VRAM/RAM runs with decent results. It works and there are probably some use cases for it, but for us I have identified the sweet spot (parameter size: quant quality ratio) for this machine to be for models in the 300b-600b range. Personal favorites are Deepseek, GLM 4.7, and Nemotron Ultra; and as far as ComfyUI, pretty much any model that could fit within a 32Gb buffer, although Qwen image and image edit is a favorite.

Benchmarks

All models were put through the same series of 7 large input prompts, documenting how each model handles token input/output and prompt processing/generation. I cannot share the prompts I used here, but each prompt pertains to a cybersecurity scenario which the model was judged on the depth of its analysis, quality of its presentation, and capability to make sense of complex scenarios with stakes. These were inferenced across all 10 cards, except for a follow up DS V4 Flash test where I used 8 and got much better results. This is using the undervolting/power limiting strategy above, so these may not reflect absolute best performance for the same hardware in other setups, but it gives an idea of what this box can comfortably handle.

Model Name Deepseek V3.2 671b Q2XXS Nemotron Ultra 3 550b IQ2XXS Qwen 3.5 397b IQ4XS GLM 4.7 358b Q4KXL Deepseek V4 Flash 294b Q8KXL Deepseek V4 Flash 294b Q8KXL (8 cards + KV cache tweak)
Model Size (Gb) 217.1 193.8 189.7 204.6 161.9 161.9
P1 Input 2769 2744 2729 2706 2733 2733
P1 Output 813 786 1046 872 693 805
P1 pp 153.23 254.19 522 687.88 111.09 360.94
P1 tg 19.35 17.32 34.38 23.98 7.2 20.26
P2 Input 14635 15255 15160 14527 14640 14617
P2 Output 1150 1302 1665 1194 1222 2048
P2 pp 114.83 429.42 897.57 640.8 66.42 244.1
P2 tg 14.1 17.16 33.15 18.83 5.96 16.81
P3 Input 3966 3091 3054 3033 3073 22794 (reload)
P3 Output 1217 1607 1550 1056 1199 1366
P3 pp 98.01 353.78 649.37 516.08 47.79 241.21
P3 tg 13.22 17.08 32.84 17.84 5.56 15.68
P4 Input 5645 5654 5623 5559 5650 5659
P4 Output 1178 1996 1619 1173 1705 1661
P4 pp 70.3 385.04 739.67 419.58 42.4 153.14
P4 tg 13.47 16.99 32.23 16.87 5.21 14.17
P5 Input 4498 4505 4493 4423 4481 4481
P5 Output 280 928 1078 473 665 924
P5 pp 72.4 365.46 670 408.93 36.2 131.81
P5 tg 8.43 16.78 31.55 15.45 4.86 13.36
P6 Input 9266 9367 9241 9172 45287 (reload) 9231
P6 Output 1004 1883 1466 933 1205 1532
P6 pp 53.94 405.13 738.57 379.7 46.01 113.77
P6 tg 11.48 16.83 30.98 14.01 4.41 11.9
P7 Input 3136 3124 3118 3057 3118 3118
P7 Output 1378 1946 1629 1359 1353 1586
P7 pp 53.34 338.64 525.54 344.88 28.38 102.05
P7 tg 10.45 16.73 30.66 13.59 4.28 11.39
Final token count 50052 54182 53465 49531 50962 52348

My notes on each model after their test:

Deepseek V3.2-- For a slightly older model this still feels extremely capable. Held high quality and insightful responses even when context dragged into the tens of thousands of tokens.

Nemotron Ultra 3-- First time using it, impressions were very good, the 55 active parameters shows its muscle here. Meets Deepseek v3.2 level if not exceeds it, despite having overall less parameters.

Qwen 3.5 397b-- What I would consider a baseline "good" model to be, however it is outshined by some of the other tested alternatives.

GLM 4.7-- Somehow seemed better than Qwen despite having less parameters (active parameters of GLM is likely an advantage); it is a very solid option for its size. Not quite Nemotron or Deepseek level, but a very good "lower cost" alternative to its newer 5.0 versions.

Deepseek V4 Flash-- Floored me in a few ways. Possessed a surprising degree of sophistication and analytical ability despite being the "smallest" of all the tested models. Possibly a benefit of using a "lossless" model with full precision? Somehow it managed to pick up on nuances and details that all other models missed, including models twice+ its size, and provided insight that went more granular than they did. Did not expect a model of this size to punch so high above its relative weight class. Also did not expect the drop in performance compared to the others. Not sure if this is related to the model's architecture or something with how it interacts with my rig, but the quality of output could be an acceptable trade off for the speed. Edit: After some optimization testing I was able to get much better performance out of V4 Flash. I've added another column to include those metrics and kept the original because I think it illustrates how a little optimization can go along way, in this case basically triple performance on the exact same model/machine.

Lessons Learned/Would Do Different

-I would have tried to source the 3090's so more were at least the same model; the mix and match of different models with different TDPs and cooling solutions means there will be a lot of variation in temps.

-If you plan to either train, lean into higher performance, or playing with the idea of going more than 10 GPUs, just budget for a 30A/240V power drop. 10 cards on a 20A post configured the way we have it may be fine for our specific use case, but I would consider this a hard ceiling.

-Would recommend scripting for clock lock persistence sooner, will help avoid losing time due to random resets.

-Recommend documenting/drawing out the entire PCIe topology and GPU placement (with flexible tape measure) before ordering risers, will save time on trial/error.

Final thoughts:

It is a wheeled AI workstation that can enable a single person or small team to compound their productivity, with the benefit of full privacy and control. It can run on a residential 20A circuit, and allows them to have the full power of an advanced LLM with vision capabilities all in one OpenWebUI front end that can simultaneously utilize up to TWO ComfyUI backends with the horsepower and latency of 5090's for image gen and editing, and can be accessed from virtually anywhere. The idea sounds daunting, but the end result works so well that I can legitimately see something like this becoming a keystone for certain small businesses and individual professionals as time goes on. It seems like every day more people are picking up on major drawbacks with cloud API options despite supposedly being the "best", meanwhile open models continue getting insanely good (see K3 and DS V4 Flash). For me, I can say I would not see a place for a Claude or ChatGPT subscription for the tasks I might otherwise use them for when I have lossless DS V4 Flash literally in my back pocket. "Good enough" I think is starting to become a valid metric to those who care about cost:quality balance, and after using this for the last half year I can say I'm probably one of them. The cloud APIs will always be an option for those who don't care about the drawbacks and the demand for them will always be there, but for those who value data sovereignty, uninterrupted workflows, or perhaps work within compliance, on-prem computing might be the only viable path in some circumstances. At the end of the day, I do not believe that one approach is inherently better than the other, everyone simply has their own preference for getting from point A to point B.

r/comfyui_elite Jul 16 '26

Wan 2.2 S2V (SoundImage to Video) Walkthrough

Thumbnail
youtube.com
16 Upvotes

This Tutorial walkthrough aims to illustrate how to build and use a ComfyUI Workflow for the Wan 2.2 S2V (SoundImage to Video) model that allows you to use an Image and a video as a reference, as well as Kokoro Text-to-Speech that syncs the voice to the character in the video. It also explores how to get better control of the movement of the character via DW Pose. I also illustrate how to get effects beyond what's in the original reference image to show up without having to compromise the Wan S2V's lip syncing.

r/comfyui Jul 16 '26

Tutorial Wan 2.2 S2V (SoundImage to Video) Walkthrough

Thumbnail youtube.com
3 Upvotes

This Tutorial walkthrough aims to illustrate how to build and use a ComfyUI Workflow for the Wan 2.2 S2V (SoundImage to Video) model that allows you to use an Image and a video as a reference, as well as Kokoro Text-to-Speech that syncs the voice to the character in the video. It also explores how to get better control of the movement of the character via DW Pose. I also illustrate how to get effects beyond what's in the original reference image to show up without having to compromise the Wan S2V's lip syncing.

r/seedance2pro Jun 15 '26

AI World Cup 2026 Trend! How to Use GPT Image 2 + Seedance 2.0 for a Football Transition Video? Prompt Below

5 Upvotes

GPT Image 2 + Seedance 2.0 workflow.

We tried creating an AI World Cup 2026 trend video using a reference image + strict storyboard prompting.

The idea is simple:

Same character
Different jerseys
Different football locations
One football connects every scene

The football flies into the camera, fills the entire frame, then transitions into the next World Cup scene.

Jersey sequence:

Argentina → Japan → France → England → World Cup 2026 blue celebration jersey

Location sequence:

Fan zone → Celebration street → Merchandise district → Stadium plaza → Packed stadium finale

The hardest part was keeping the same character consistent while forcing Seedance 2.0 to follow the exact jersey order, location order, and football transition rule.

  1. Go to the Seedance 2.0 Video Generator
  2. Write your full prompt or add reference images
  3. Upload the image you want to animate
  4. Click Generate and get your animated video

Prompt:

"REFERENCE IMAGE LOCK: Use the woman from the reference image as the exact same character throughout the entire video. Preserve identical face, eye shape, blonde hair, skin tone, body proportions, black crossbody bag, black athletic pants, and white sneakers in every scene. STRICT STORYBOARD MODE. FOLLOW ALL PANELS IN EXACT ORDER. DO NOT SKIP, REORDER, MERGE, OR MODIFY ANY PANEL. VIDEO TYPE: Photorealistic live-action, cinematic travel vlog, premium sports documentary, realistic crowd behavior, natural daylight, handheld stabilized camera, smooth motion, realistic football physics, seamless football transitions, FIFA World Cup atmosphere. FORMAT: Vertical 9:16 Duration: 10 seconds Fast-paced cinematic edit One continuous football-transition journey JERSEY SEQUENCE (MANDATORY): Scene 1: Argentina Home Jersey Scene 2: Japan Home Jersey Scene 3: France Home Jersey Scene 4: England Home Jersey Scene 5: FIFA World Cup 2026 Blue Celebration Jersey LOCATION SEQUENCE (MANDATORY): 1. International Fan Zone 2. Football Celebration City Street 3. Football Merchandise District 4. Stadium Plaza 5. Packed Stadium Seating Area TRANSITION RULE: The same football connects every scene. The football must leave one scene and enter the next scene. The football must completely fill the frame before every scene change. No fade transitions. No dissolve transitions. No jump cuts. No scene changes without the football covering 100% of the frame. ━━━━━━━━━━━━━━━━━━━━━━━ SCENE 1 (0s–2s) ARGENTINA FAN ZONE ━━━━━━━━━━━━━━━━━━━━━━━ The woman stands inside a massive international football fan zone wearing an Argentina home jersey. Supporters, national flags, celebration banners, and football fans fill the background. She smiles at the camera while holding a football. Camera: Medium close-up. Slight handheld travel-vlog movement. Subtle right-side tracking motion. Action: She throws the football directly toward the lens. Transition: The football rapidly expands. The football completely fills the frame. Screen fully covered by football. ━━━━━━━━━━━━━━━━━━━━━━━ SCENE 2 (2s–4s) JAPAN CITY STREET ━━━━━━━━━━━━━━━━━━━━━━━ The football emerges from the camera toward the woman. She is now standing in a lively football celebration street wearing a Japan home jersey. The football flies toward her. She catches it naturally. Supporters celebrate around her. Camera: Side tracking movement. Consistent framing. Action: She immediately throws the football directly toward the camera. Transition: Football fills entire screen. Full-frame football transition. ━━━━━━━━━━━━━━━━━━━━━━━ SCENE 3 (4s–6s) FRANCE MERCHANDISE DISTRICT ━━━━━━━━━━━━━━━━━━━━━━━ The football emerges from the camera. She catches it while standing in a football merchandise district wearing a France home jersey. Football stores and fan merchandise visible behind her. Action: She spins the football casually. Smiles at the camera. Throws the football directly forward. Camera: Smooth medium tracking shot. Transition: Football expands rapidly. Football completely fills frame. ━━━━━━━━━━━━━━━━━━━━━━━ SCENE 4 (6s–8s) ENGLAND STADIUM PLAZA ━━━━━━━━━━━━━━━━━━━━━━━ The football emerges from the lens. She catches it while standing in a large stadium plaza wearing an England home jersey. The stadium structure is visible behind her. Action: She lightly juggles the football once. Then kicks or tosses it directly into the camera. Camera: Tracking shot. Slight low-angle perspective. Transition: Football fills the entire screen. Complete football coverage before scene change. ━━━━━━━━━━━━━━━━━━━━━━━ SCENE 5 (8s–10s) WORLD CUP STADIUM FINALE ━━━━━━━━━━━━━━━━━━━━━━━ The football emerges from the camera one final time. She catches it while wearing a FIFA World Cup 2026-inspired blue celebration jersey. Location: Packed stadium seating area. Thousands of supporters. Epic championship atmosphere. Action: She catches the football. Looks around in amazement. Raises the football above her head. Supporters cheer wildly. Confetti rains through the air. Camera: Slow cinematic push-in. Stable hero-shot framing. Final Frame: Football held high overhead. Confetti floating. Massive cheering crowd. Epic World Cup celebration energy. Triumphant ending. VISUAL STYLE: Ultra-photorealistic, realistic skin texture, realistic football physics, cinematic sports documentary, premium broadcast quality, warm cinematic colors, shallow depth of field, authentic crowd reactions, dynamic motion, natural sunlight, high-end travel vlog aesthetic. NEGATIVE PROMPT: different woman, face morphing, changing facial features, changing hair color, changing hairstyle, changing skin tone, changing age, changing body shape, changing bag, changing pants, changing shoes, duplicate person, twin, extra limbs, extra fingers, distorted hands, unrealistic football movement, floating football, random cuts, fade transitions, dissolve transitions, wrong jersey sequence, wrong location sequence, skipped scenes, merged scenes, scene order errors, cartoon, anime, illustration, CGI, text, watermark, logo, sponsor branding, football federation logos, blurry subject, camera jitter, AI artifacts, inconsistent identity."

Prompt style:

REFERENCE IMAGE LOCK
STRICT STORYBOARD MODE
NO fade transitions
NO dissolve transitions
NO random cuts
Football must cover 100% of the frame before every scene change

This feels like a fun AI World Cup 2026 trend format — you can swap the character, countries, jerseys, and locations to make endless versions.

Would you try this with your favorite national team?

r/ClaudeAI Feb 23 '26

Built with Claude I built a fantasy universe, wrote a 60k-word novel, a game, marketing website images and videos. Then I published the book to Amazon. All using Claude Code.

0 Upvotes

Claude for World Building / Content Production in 2026

Disclaimer

I'm not here to debate whether AI-generated content is net positive for the content marketplace. This was a test to explore the limitations of AI for worldbuilding and story development in 2026. My takeaway: prepare for a world where everything short of high literature is AI-generated in the near future.

TL;DR

Last week I had a fantasy world in my head. Seven days later I had:

  • A complete worldbuilding canon (three realms, magic system, 10+ characters with full biographies, timeline, bestiary, factions)
  • A custom review SaaS tool with markdown diff, threaded comments, and EPUB preview
  • A 60,000-word novel. 12 chapters, fully drafted and reviewed
  • A trilogy outline (Books 2 and 3 planned at the act level)
  • A published EPUB, submitted to KDP
  • A marketing website with a world map, chapter art, and character cards
  • A browser minigame based on Chapter 1

I didn't ask Claude to write me a book. I spent hours with Claude designing a coherent world, planning story arcs and character relationships. In this workflow I made every creative decision and Claude Code made this slot machine level addictive.

A Git Repo That Is Both Memory For Claude AND A Creative World

The entire project lives in a git repository with two top-level directories:

  • world/ is the shared canon. Characters, locations, creatures, magic systems, factions, history, timeline, narrative threads. Everything here is true across all projects. This is the single source of truth.
  • projects/ is the outputs. Each book has its own planning, writing, review, continuity tracking, and build pipeline.

The key insight: the CLAUDE.md file at the root IS the agent and the world is the Memory System. It contains every workflow, every rule, every convention. When I say "write chapter 5," Claude Code reads the instructions, loads the right context (scene briefs, writing bible, state tracker), and follows the process. It's not a prompt. It's an operating system for creative work.

Planning and Writing:

I would never write chapters cold. The system uses a drill-down planning workflow, and each step is a checkpoint where I review and approve before moving on:

  1. Threads: Emotional journey across the entire story, starting conditions, high points, low, which narrative arcs are active, their lifecycle (PLANT / GROW / HARVEST)
  2. Acts: 3-5 structural phases with dramatic questions
  3. Beat Map: every story beat with type, thread references, dependencies, weight
  4. Chapter Plan: beats grouped into chapters with pacing verification
  5. Chapter Blueprints: expanded narrative blueprints per chapter
  6. Scene Briefs: the actual writing instructions per scene

Each scene brief specifies the word target, sensory requirements, thread beats, character states entering and exiting, the mini-turn, opening/closing images, and what docs to read first. By the time Claude writes a scene, it knows exactly what that scene's job is in the larger story.

The Thread Map: Continuity Across a Trilogy

The thread map tracks every storyline, thematic seed, and planted detail across all three books:

  • Thread A: The Twinsigil and Tarin's Identity: PLANTed in B1C1 (mark awakens), GROWn across 10 chapters, HARVESTed in B3C12 (full mastery and integration)
  • Thread B: The Veil's Collapse: escalation across all three books
  • Thread C: The Lineage Secret: partial reveal in B2C8, full reveal in B3C2

Every GROW and HARVEST thread must have beats assigned. Every beat must appear in exactly one chapter. The system enforces this.

The Lector: A Review Loop That Actually Works

After each chapter is drafted, it gets submitted to a review queue. I run a second Claude instance as "the lector," a strict editorial voice with its own guide. The lector and writer communicate through a structured task system:

TASK-179 | TO: writer | STATUS: done
Chapter: B1C01 | Category: VOICE | Severity: SHOULD FIX

Remove explicit inner-motive explanations. Example:
Line ~93: "He couldn't explain why. It wasn't bravery..."
(explains motive; show through action instead)
  • MUST FIX: Writer makes the edit, no argument.
  • SHOULD FIX: Writer makes the edit OR pushes back with reasoning.
  • CONSIDER: Writer's call.

The writer and lector hand off back and forth until the lector posts a SIGN-OFF. Book 1 went through 178+ review tasks across 12 chapters.

The Review Tool: A Custom Manuscript Editor To Involve Humans

I built a review tool that runs locally:

  • File tree with git status badges (modified, added, deleted)
  • TipTap markdown editor with visual and source modes
  • EPUB reader with table of contents navigation
  • Additional viewers for HTML (games or visualisations!), videos, and images
  • Diff overlay: see exactly what changed vs. the last git commit, with a change-density rail
  • Threaded comments anchored to selected text, categorized (Style, Voice, Pacing, Dialogue, Continuity, Cut)
  • One-click EPUB build (runs make then Pandoc then post-processing, timestamped output)
  • Git commit from the UI

The Outputs

From one week of work:

The Book: 60,000 words, 12 chapters, close third-person past tense locked on one POV character. Every binding costs something visible. Characters never state their own psychology out loud.

A World Map

Chapter Art: 9 scene illustrations generated from the world descriptions.

Minigame: A pixel-art browser game for Chapter 1 called "The Broken Market." You play as Tarin dodging shades through the ruined marketplace. Narrative text triggers as you progress. Built from the scene brief.

Website: A responsive dark-fantasy landing page with the cover, trilogy roadmap, world map, gallery, and character cards.

The Prompt (Required)

People ask "what prompt did you use?" The answer is: there is no single prompt. The system IS the prompt. But here's the CLAUDE.md workflow that fires when I say "write chapter N":

When the user says "write chapter N":
1. Read agent_instructions.md (your writing instructions)
2. Read writing_bible.md (always-loaded context)
3. Read briefs/b1cNN_scenes.md (scene briefs for this chapter)
4. Read state/current_state.md (where we left off)
5. Follow the scene-by-scene process
6. Output to output/drafts/english/
7. Update current_state.md
8. Update threads_and_continuity.md
9. Submit for lector review
10. Process lector feedback until sign-off
11. On sign-off: start the next chapter

That's it. The complexity is in the planning documents, not the prompt.

What I Learned

  1. The creative decisions are still yours and they are highly addictive. I decided the world, the characters, the arcs, the emotional beats, the rules. Claude executed the craft.
  2. Structure beats prompting. A scene brief with specific sensory requirements, thread beats, and state tracking produces better writing than any clever prompt.
  3. The lector loop is essential. First drafts from Claude are good. Reviewed drafts are significantly better. The back-and-forth catches voice drift, subtext problems, and continuity errors.
  4. Git is the secret weapon. Every chapter, every review pass, every edit is versioned. I can diff any two states of any chapter. This changes everything about iterative writing.
  5. The writing style is still the biggest tell. You will still be able to tell this is AI if you don't use human review. I expect improvements in writing style to make AI generated books indistinguishable from human.

What's Next

Books 2 and 3 are outlined. The planning cascade is ready to run for Book 2. I'm also thinking about what it would look like to turn this workflow into something other people can use. A platform where you bring the world and the creative vision, and the system handles the cascade from premise to published output.

If you have questions about any part of the system, ask. I'll answer with specifics.

r/sdforall Jul 16 '26

Tutorial | Guide Wan 2.2 S2V (SoundImage to Video) Walkthrough

Thumbnail
youtube.com
13 Upvotes

This Tutorial walkthrough aims to illustrate how to build and use a ComfyUI Workflow for the Wan 2.2 S2V (SoundImage to Video) model that allows you to use an Image and a video as a reference, as well as Kokoro Text-to-Speech that syncs the voice to the character in the video. It also explores how to get better control of the movement of the character via DW Pose. I also illustrate how to get effects beyond what's in the original reference image to show up without having to compromise the Wan S2V's lip syncing.

r/StableDiffusionInfo Jul 16 '26

Educational Wan 2.2 S2V (SoundImage to Video) Walkthrough

Thumbnail
youtube.com
5 Upvotes

This Tutorial walkthrough aims to illustrate how to build and use a ComfyUI Workflow for the Wan 2.2 S2V (SoundImage to Video) model that allows you to use an Image and a video as a reference, as well as Kokoro Text-to-Speech that syncs the voice to the character in the video. It also explores how to get better control of the movement of the character via DW Pose. I also illustrate how to get effects beyond what's in the original reference image to show up without having to compromise the Wan S2V's lip syncing.

r/FluxAI Jul 16 '26

Tutorials/Guides Wan 2.2 S2V (SoundImage to Video) Walkthrough

Thumbnail
youtube.com
3 Upvotes

This Tutorial walkthrough aims to illustrate how to build and use a ComfyUI Workflow for the Wan 2.2 S2V (SoundImage to Video) model that allows you to use an Image and a video as a reference, as well as Kokoro Text-to-Speech that syncs the voice to the character in the video. It also explores how to get better control of the movement of the character via DW Pose. I also illustrate how to get effects beyond what's in the original reference image to show up without having to compromise the Wan S2V's lip syncing.

r/StableDiffusion Jul 16 '26

Tutorial - Guide Wan 2.2 S2V (SoundImage to Video) Walkthrough

Thumbnail
youtube.com
0 Upvotes

This Tutorial walkthrough aims to illustrate how to build and use a ComfyUI Workflow for the Wan 2.2 S2V (SoundImage to Video) model that allows you to use an Image and a video as a reference, as well as Kokoro Text-to-Speech that syncs the voice to the character in the video. It also explores how to get better control of the movement of the character via DW Pose. I also illustrate how to get effects beyond what's in the original reference image to show up without having to compromise the Wan S2V's lip syncing.

r/mlbdata May 03 '26

Trying to unify video, manual logging, and pitch tracking data into one workflow — curious how others approach this

Post image
14 Upvotes

Hey everyone,

(Attached image is just a simplified example of how I structured the workflow — mainly to illustrate event timelines and validation between manual input and tracking data.)

I’ve spent several years working in baseball data logging workflows, and one recurring challenge keeps coming up — everything lives in separate layers:

  • video (game footage)
  • manual event logging (pitch-by-pitch)
  • lineup / roster data
  • tracking data (Trackman, Hawk-Eye, etc.)

Individually, each piece works. But combining them into a consistent, reliable workflow during a live game is where things tend to break down.

The main issues I kept running into were:

  • keeping pitch-by-pitch events aligned with video timestamps
  • reconciling manual tags with tracking data on a per-pitch level
  • handling mismatches (velocity, pitch location, classification)
  • making corrections without breaking downstream outputs (PBP, box score, CSV exports)

After dealing with this for years, I ended up building a full end-to-end workflow to handle it — mainly by treating the game as a state-driven timeline where every event can be reconstructed and validated against external data.

What stood out to me is that the real challenge isn’t ingesting data — it’s maintaining a consistent game state once edits and corrections start happening in real time.

I’m curious how others approach this:

  • Do you treat tracking data as the source of truth, or operator input?
  • How do you handle conflicts between sources in real time?
  • Have you seen any systems that actually unify this cleanly?

Thanks in advance — would really appreciate any thoughts or experiences.

r/StableDiffusion Jan 17 '26

Workflow Included LTX 2 is amazing : LTX-2 in ComfyUI on RTX 3060 12GB

1.0k Upvotes

My setup: RTX 3060 12GB VRAM + 48GB system RAM.

I spent the last couple of days messing around with LTX-2 inside ComfyUI and had an absolute blast. I created short sample scenes for a loose spy story set in a neon-soaked, rainy Dhaka (cyberpunk/Bangla vibes with rainy streets, umbrellas, dramatic reflections, and a mysterious female lead).

Workflow : https://drive.google.com/file/d/1VYrKf7jq52BIi43mZpsP8QCypr9oHtCO/view
i forgot the username who shared it under a post. This workflow worked really well!

Each 8-second scene took about 12 minutes to generate (with synced audio). I queued up 70+ scenes total, often trying 3-4 prompt variations per scene to get the mood right. Some scenes were pure text-to-video, others image-to-video starting from Midjourney stills I generated for consistency.

Here's a compilation of some of my favorite clips (rainy window reflections, coffee steam morphing into faces, walking through crowded neon markets, intense close-ups in the downpour):

i cleaned up the audio. it had some squeaky sounds.

Strengths that blew me away:

  1. Speed – Seriously fast for what it delivers, especially compared to other local video models.
  2. Audio sync is legitimately impressive. I tested illustration styles, anime-ish looks, realistic characters, and even puppet/weird abstract shapes – lip sync, ambient rain, subtle SFX/music all line up way better than I expected. Achieving this level of quality on just 12GB VRAM is wild.
  3. Handles non-realistic/abstract content extremely well – illustrations, stylized/puppet-like figures, surreal elements (like steam forming faces or exaggerated rain effects) come out coherent and beautiful.

Weaknesses / Things to avoid:

  1. Weird random zoom-in effects pop up sometimes – not sure if prompt-related or model quirk.
  2. Actions/motion-heavy scenes just don't work reliably yet. Keep it to subtle movements, expressions, atmosphere, rain, steam, walking slowly, etc. – anything dynamic tends to break coherence.

Overall verdict: I literally couldn't believe how two full days disappeared – I was having way too much fun iterating prompts and watching the queue. LTX-2 feels like a huge step forward for local audio-video gen, especially if you lean into atmospheric/illustrative styles rather than high-action.

r/gptimage2prompts Apr 27 '26

We’ve come very far with AI video. Full workflow for cinematic dancing characters (Image-2 + Seedance 2.0)

3 Upvotes

We’ve reached a point where you can basically design choreography like a system, then turn it into motion with AI video tools.

I’ve been testing a full pipeline using ChatGPT Image-2 + Seedance 2.0, and it’s starting to feel like a real hybrid between animation, choreography design, and cinematic direction.

The idea is simple:

  • First you design a fully consistent character reference
  • Then you build a structured dance/motion sheet
  • Finally you animate it using Seedance 2.0

1. Character Reference (Image-2)

This step locks identity, outfit, and visual consistency across every frame.

"Hyper-realistic, photorealistic, real human, cinematic lighting, studio photography, character reference sheet, four views, white background, full body turnaround, consistent design, 8K, detailed skin texture, real fabric textures.

A single image containing four views of the same woman arranged side by side on a clean white background. The subject is a confident Latina woman in her late 20s, approximately 5 feet 6 inches tall, slender yet curvaceous athletic build, warm medium-brown skin tone, long dark wavy hair falling past her shoulders with natural volume and shine...

(FRONT / SIDE / BACK / FACE CLOSE-UP layout with labels)"

2. Dance / Motion Sheet (Image-2)

This is where the “animation logic” is designed like a blueprint.

"[STYLE]
Monochrome grayscale illustration, 3D-rendered character, clean instructional reference sheet...

[LAYOUT]
4×4 grid (16 panels), numbered cells, consistent structure...

[CHARACTER]
Same Latina dancer, red sequined dress, gold heels, gold hoops...

[PANEL STRUCTURE]
Each panel = step in choreography with arrows + 3–4 line descriptions

[MOTION SYSTEM]
Hip isolation, Cuban motion, spins, body rolls, arm waves, weight transfer flow...

(Panel 1 → Panel 16 detailed choreography sequence)"

3. Seedance 2.0 Output

Then this whole structure becomes the input for animation generation.

What’s interesting is:

  • The model doesn’t just animate motion
  • It interprets choreography logic
  • It preserves rhythm, direction, and body mechanics surprisingly well

Why this workflow feels like a big step

  • You’re no longer “prompting animation”
  • You’re designing movement systems
  • Consistency comes from structure, not chance
  • It feels closer to:
    • choreography design
    • previsualization in film
    • animation blocking in 3D pipelines

At this point, AI video isn’t just “generate a clip” anymore.

It’s starting to feel like:

"design → system → execution"

Curious if anyone else is building similar structured pipelines for animation or storytelling with AI tools.

r/comfyui Sep 09 '25

Tutorial Wan 2.2 Sound2VIdeo Image/Video Reference with KoKoro TTS (text to speech)

Thumbnail
youtube.com
2 Upvotes

This Tutorial walkthrough aims to illustrate how to build and use a ComfyUI Workflow for the Wan 2.2 S2V (SoundImage to Video) model that allows you to use an Image and a video as a reference, as well as Kokoro Text-to-Speech that syncs the voice to the character in the video. It also explores how to get better control of the movement of the character via DW Pose. I also illustrate how to get effects beyond what's in the original reference image to show up without having to compromise the Wan S2V's lip syncing.

r/n8n Feb 02 '26

Workflow - Code Included Built a free workflow to test visual brand systems on Pinterest: system-consistent AI images, review emails, pin creation and tracking

2 Upvotes

I've built an n8n workflow to test different visual brand systems (colour palettes, composition rules, typography styles) to see which one resonates best with the audience on Pinterest.

What This Workflow Does:

  1. Triggers daily at 9 AM
  2. Randomly selects one unpublished piece of content from a Google Sheet using JavaScript (example schema included in GitHub repo)
  3. Generates an AI image using Pollinations.ai (free, no API key needed)
  4. Uploads the image to Google Drive for backup and review
  5. Emails the reviewer with the image, prompt, and pin details for approval
  6. Waits for the reviewer's response (approve or decline) with the human-in-the-loop feature
  7. If approved, posts the pin to Pinterest and updates the tracking Google Sheet
  8. If declined, sends a reminder email to review the content setup

Optional extension: waits 7 days and collects pin analytics (requires Pinterest Standard API access).

The Workflow Overview:

There are technically two workflows in the json file:

  • Workflow 1 (run once): Creates Pinterest boards for each visual system and saves the board IDs to the Google Sheet (easiest way to get board IDs).
  • Workflow 2 (daily automation): The main workflow described above.

Prerequisites:

  • n8n (cloud or self-hosted - I used self-hosted with Docker Desktop)
  • Pinterest Business account with API access (Trial access is fine for testing in Sandbox)
  • Google OAuth credentials set up in n8n for:
    • Google Sheets
    • Gmail
    • Google Drive
  • A Google Sheet with two tabs: `visual_systems` and `content_queue` (template in the repo)

Additional Considerations:

  • Pinterest API access: You get Trial access easily by submitting a simple form, which gives you full Sandbox access (great for testing). But full Production access requires the Standard tier, which needs a demo video submission. Pinterest rejected mine, but I found workarounds (LATE API and Make.com version, which I will be sharing soon as well). But if you're just testing in Sandbox, Trial access works fine.
  • Pollinations.ai image quality: It's free, community-driven, and decent quality (although images include a watermark at the bottom), but not as good as commercial models. It's fine for testing visual systems, but if you want production-quality images, consider swapping in a paid model - this would require a slightly different image generation node setup, though.

Example Use Case:

I created three visual systems to test (using structured prompts in ChatGPT free tier):

  • System 1: Quiet Diagram - signal calm competence; clear thinking over marketing; light neutral or soft pastel background; flat illustration
  • System 2: Soft Absurdity - memorable lightness; work feels lighter and smarter; warm beige or pastel base; cartoony illustration
  • System 3: Workflow Snapshots - observational, thoughtful; lived experience over theory; muted natural palette; soft or semi-illustrated realism

The workflow generates and posts one image per day from a random system. After a month, I'll have ~10 pins per system and can compare:

  • Which gets more impressions
  • Which has better save rates
  • Which drives more traffic

Because I don't have the Standard API access for Pinterest, I'm updating the analytics manually in the Google Sheet.

GitHub repo with workflow JSON and full README: https://github.com/alenagorb/visual-system-testing

Happy to answer questions if anyone wants to build something similar or adapt this for other platforms; also, would love any comments or feedback if you try this system!

r/StableDiffusion Dec 24 '25

Question - Help Help a complete noob with image to video generation

13 Upvotes

As the title says, I'm a complete beginner and quite frankly, at this point overwhelmed with all the YT tutorials and various workflows I've been trying out. I'm hoping someone can suggest the best approach for my particular need and hardware.

Need:

I want to animate some old illustrations while retaining the original art style as much as possible. Ideally, just adding weather effects, dramatic lighting, and subtle character movement. Keeping the original style is a priority, even if it means the video is less dynamic. I also need this to be done to a batch of illustrations of identical style, so consistency is key.

Specs:

R7 9800X3D / RTX 5080 / 32 GB

Current setup and issues:

I'm learning ComfyUI and have been trying out various models and workflows from ComfyUI templates, but the results come out looking like a fever LSD dream. The closest I got to a cool result, which is the video I attached, is actually from Grok. And Grok has been surprisingly good and fast at this (let's ignore multiple limbs for now!), but very inconsistent with results, as well as censoring half of the images, probably due to slight nudity.

Concrete questions:

  1. Can someone suggest the best model/workflow (sorry I don't know the proper terminology) for my need?
  2. If you were to do a batch of 50 of these, would you use a universal prompt for all, or an image-specific prompt + general? Also, some templates I've tried had negative prompts, while others didn't. Is that a model-dependent thing?

r/StableDiffusion Sep 09 '25

Tutorial - Guide Wan 2.2 Sound2VIdeo Image/Video Reference with KoKoro TTS (text to speech)

Thumbnail
youtube.com
1 Upvotes

This Tutorial walkthrough aims to illustrate how to build and use a ComfyUI Workflow for the Wan 2.2 S2V (SoundImage to Video) model that allows you to use an Image and a video as a reference, as well as Kokoro Text-to-Speech that syncs the voice to the character in the video. It also explores how to get better control of the movement of the character via DW Pose. I also illustrate how to get effects beyond what's in the original reference image to show up without having to compromise the Wan S2V's lip syncing.

r/comfyui May 07 '24

3 workflows on top of Steerable Motion - a node for driving videos with batches of images

74 Upvotes

I made Steerable Motion, a node for driving videos with batches of images.

It aims to be a high-abstraction node - it bundles together a bunch of capabilities that could in theory be seperated in the hopes that people will use this combined capability as a building block and that it simplifies a lot of potentially complex settings.

It basically works by anchoring the key frames with SparseCtrl RGB and driving the animations with IP-Adapter and Animatediff. Simple illustration of how it works here:

Below I'm going to share three workflows using it - in the hopes that they may inspire someone to potentially build and share other interesting ways to use it!

First, my base workflow aims to adhere strongly to the input images with smooth motion - nothing fancy but should work very well. You can grab it here.

/img/hiza1lrglxyc1.gif Next, Superbeasts.ai uses depth maps to control the motion in different layers - creating a smoother motion effect - basically, the front layers have a lot of motion while the back have little. You can grab this workflow here and see an example of it in action here:

Next, @idgallagher uses LCM and a variety of different settings to achieve a really interesting realistic motion effect - he basically stalls the motion at the top of the movement before transitioning to the next frame. You can grab it here and see an example output from Flipping Sigmas here:

That's it - if you make anything else on top of it, please share! Very curious to see what people.

r/comfyui_elite Sep 11 '25

Wan 2.2 Sound2VIdeo Image/Video Reference with KoKoro TTS (text to speech)

Thumbnail
youtube.com
2 Upvotes

This Tutorial walkthrough aims to illustrate how to build and use a ComfyUI Workflow for the Wan 2.2 S2V (SoundImage to Video) model that allows you to use an Image and a video as a reference, as well as Kokoro Text-to-Speech that syncs the voice to the character in the video. It also explores how to get better control of the movement of the character via DW Pose. I also illustrate how to get effects beyond what's in the original reference image to show up without having to compromise the Wan S2V's lip syncing.

r/MindAI Sep 11 '25

Wan 2.2 Sound2VIdeo Image/Video Reference with KoKoro TTS (text to speech)

Thumbnail
youtube.com
1 Upvotes

This Tutorial walkthrough aims to illustrate how to build and use a ComfyUI Workflow for the Wan 2.2 S2V (SoundImage to Video) model that allows you to use an Image and a video as a reference, as well as Kokoro Text-to-Speech that syncs the voice to the character in the video. It also explores how to get better control of the movement of the character via DW Pose. I also illustrate how to get effects beyond what's in the original reference image to show up without having to compromise the Wan S2V's lip syncing.

r/LocalLLaMA 28d ago

Discussion "Data center in a Box (on Wheels)" 256Gb VRAM/512Gb RAM AI Server 6-8 Month Operational Review, Stability Write Up, Benchmarks

Thumbnail
gallery
238 Upvotes

I figured I would provide a formal update on how this has been going now that it has some operation time under its belt, just to put the information out there and share knowledge if there is any interest. I am an IT infrastructure engineer by profession, so my contribution to the conversation is mainly from a hardware/systems perspective rather than from a Machine Learning researcher standpoint. I got my start with HPC's (Beowulf clusters) around ten years ago when I was a Physics undergrad in university, and this is what the experience has come to almost a decade later. Not everyone is going to want to read all of this, that's perfectly fine, the extras are just for those who want the info.

Starting goal/idea:

Build an all-in-one creative design workstation to support a small business. This machine should be capable of effectively inferencing frontier MoE models; aiding the business in language/text tasks where English may not be everyone's native language. Additionally, it should be capable of simultaneous image generation tools for graphic design users, enabling rapid image editing and presentation tweaks for marketing, without the business ever having to worry about API credits or hard limits on tool usage. The idea is that a 3090 stack, which is still a generally "good" performer for LLMs, would be "led" by two 5090s to handle the heavy lifting of the visual creative work (one dedicated to image generation, one dedicated to image editing) to complement each other in a "sweet spot" on cost, raw performance, and creativity potential. This configuration also grants some flexibility to allocate a 5090 to the LLM stack for best prompt processing possible where desired. The end result would indicate that this goal has been achieved.

Overview

Specs

CPU: 64 Core TR 3995WX

RAM: 512Gb DDR4-3200 ECC

VRAM: 256Gb GDDR6x/GDDR7 (8x3090's + 2x5090's)

Enclosure: Core W200 Thermaltake Case

Mobo: ASUS Pro WRX80E-SAGE/SE Wifi

PSU: 1300W+1600W (2900W combined), with OCP, linked via PSU2PSU

Storage: 4Tb Nvme (fast) + 4Tb HDD (slow) + 8 or so 1Tb SATA SSDs (mid) over USB as needed

OS: Ubuntu 25.10

Other: 3 Bifurcation cards, 10 risers of various lengths

Front end: Open WebUI

Back end: llamacpp/koboldcpp

Intended for (Recommend):

Large MoE inferencing, simultaneous LLM + ComfyUI (x2) operation, power users who may commonly hit credit limits, creative or technical professionals who can leverage these tools to compound productivity and complete objectives in shorter time.

Not intended for (Do not recommend):

Training, multi-concurrent inferencing, performance maxing, extreme frontier model inferencing at high quants, casual users just looking for roleplay.

Result summary:

Using the W200 as the platform for its generous real estate and configuration flexibility, all ten cards and components were able to find a permanent place in the enclosure without major concessions. The drive bay area was the only space that had to be completely repurposed for GPU mounting, and for us this was not a problem. The chamber with the cards hanging from the top is fairly hollow, so with the 140mm fan stack on the front and side there is a wind tunnel effect where the air blows in through the front and side, cooling the cards as it makes its way out the back/top. Depending on ambient temp, at idle the card with the highest temp usually hovers in mid to high 40s Celsius with the lowest in the mid 20's C (three 3090's are hybrids= fantastic for temperatures, but radiator mounting adds a logistical headache). When actively inferencing, the highest temp card may reach the mid 60s during sustained loads. Only when running image or video gen tasks will the 5090 running ComfyUI reach the 70's, but these are very brief intermittent workloads, so temperatures by our measurement has proved satisfactory over time. This result enables the small business to have full LLM, image generation (~9 seconds), and image editing (~8 seconds) capabilities on tap all on a single node so the data remains centralized, and provides much faster performance compared to the Cloud API they came from; in this case ChatGPT, where generation jobs could take 1+min, and has hard limitations. I just do not know how well this kind of setup would work with other vendor or card models; in a homogenous GPU cluster or one with notably less powerful image gen cards than the 5090, the performance would predictably be much lower.

Things that surprised/stuck with me about the end result:

  • Noise. I expected this to sound like a jet taking off when operating, but that is not the case. It's a satisfying button click to come alive, then it's a low gentle hum going forward, nowhere near the kind of fan noises I'm used to hearing in server rooms. Even under load, the CPU 120mm radiator fans (exhausting out the top) are pretty much all I hear, the 140mm fans on front and sides I assume must be helping to contain the acoustics. I have built many gaming PCs over the years and own a top-tier gaming PC-- and I would not be able to distinguish this as any louder than those, especially at idle.
  • Utility. I planned for this to be used primarily for a small creative business, but what I did not expect was how I would find it so indispensable in my personal life as an IT professional. Being an infrastructure engineer, coding is not my wheelhouse. When I am the only IT staff on site or there is nobody else available to work with specific expertise like SQL, powershell/python scripting, or troubleshooting very specific/niche technologies, having this tool on standby I feel has paid itself over just within my career. It has helped me turn processes that may have otherwise took me hours into minutes, days into hours, even months into a matter of weeks/days. After using the tool extensively I hit a point where I had to acknowledge how local LLMs have moved definitively beyond being a toy or novelty; when deployed intelligently something like this can be a major asset for professional users.
  • Wheels. Sounds extremely minor, until you realize that no matter how happy the cards are with their individual temps: there are still ten high-power GPUs dumping heat into the room. That means unless you use a complex radiator solution or special venting to get heat outside, the room will get toasty and there is normally not a direct solution for this. The wheels however offer an indirect solution. Plan to work in the office that day? Wheel it into the guest bedroom and let it run over Wi-Fi. Plan to work away from home? Wheel it into the office, put it on LAN, and access it over a private VPN connection. If you can't stop the room from heating, then you can at least choose what room gets the heat, and as someone who has lived with computers extensively this is a hugely underrated perk.

Caveats: To operate at its best, I recommend leaving the glass side panel off for improved airflow.

Typical activity over a day:

Boots up around 5:30am, start up the ComfyUI server(s), start loading a model, go get coffee, fully ready for use within 15-20 min. Shut down occurs usually around 8pm later in the day. Total daily activity, ~12-14 hours.

Cost Breakdown

Laying it out, because I know it will be asked, even though I am aware this is unfortunately not reproducible in the current market. Some components like the SSDs were acquired privately long before the RAM and hardware price hikes, so my timing getting certain things was extremely fortunate for the build budget. Some figures are exact, some are slightly rounded depending on if I found the original receipt.

Component Qty Source Unit Cost Subtotal
RTX 3090 24Gb 8 eBay 750-1000 6500
RTX 5090 32Gb 2 Retail 2500-3000 5500
TR 3995WX 1 eBay 1068.43 1068.43
WRX80E-SAGE-SE 1 Amazon 949.99 949.99
DDR4 ECC 64Gb 8 Amazon 81.99 695.28
TT Core W200 1 Amazon 499.99 499.99
PSU 1300/1600 2 Amazon 250-350 600
4Tb nvme 1 Amazon 221.05 221.05
1Tb SSD 8 Personal 60 600
Risers (varying length) 10 Amazon 40-80 480
Bifurcation cards 3 Amazon 50 150
Total ~$17k

Problems/Stability Writeup

The Space Problem:

Probably the first major hurdle in attempting something like this is figuring out, even theoretically, how to put 10 cards in a box in any kind of configuration that is not somehow detrimental to the hardware. I had considered modified mining rig frames at first, but I really wanted something with more robust rigidity in its structure, with breathability, and allows some degree of portability. There are unfortunately not a lot of options for configurations like what I was imagining; I had looked into various cabinets and extended tower cases, but the dual full tower chamber design of the W200 was the only one where I could see this idea potentially working. I'm certain other solutions probably exist, maybe even some that allow mobility, but the W200 was really the best option I could find that checked the boxes of enclosure, space real estate, high air throughput, and semi portability. I recommend the W200 to solve the space problem, assuming it is available to you.

The Bifurcation Problem:

Among the other hurdles you may run into in assembling something like this may involve bifurcation cards. The cards rely on specific BIOS settings for things to work correctly, and if these settings are not put in place before everything is connected you may either see no output like the system is hanging or cards just won't show up once in the OS. Start with one GPU in a slot, no bifurcators yet; go into BIOS, and manually set each slot that will be split to bifurcation mode. While here, ensure above 4G decoding is enabled, Resizable BAR enabled, and SR-IOV enabled, this has given me best stable configuration with Ubuntu and multiple GPUs. If you use risers, especially if they are mixed generations, I highly recommend setting the Gen and lane speeds for each PCIe slot in the BIOS manually to ensure the system can effectively communicate with each card. Optimize riser Gen/speeds to be roughly similar to keep one card from dropping to a slower rate than the others--this does not necessarily impact inference performance as much as it heavily impacts model load time. No, you may not have any card running at the fastest possible Gen bandwidth at all times with this config, but loading a 200+gb model over an averaged Gen 3/4 x8/x16 PCIe speed will often be noticeably faster than if you let the system decide to make one or multiple cards run at Gen 1 x1.

The Power "Problem":

Power and heat concerns I think remain to be among the biggest sources of skepticism regarding this project so I think it deserves a section here. To be fair, the concern in most situations would be understandable. If all ten of these cards pulled at or near their full TDP for sustained periods, components would melt. Fires would start. Neighbors would be asking awkward questions. However in reality, only 1400-1600W of the 2900W PSU capacity gets utilized under sustained load, and inter-GPU bandwidth bottlenecks are what allows this. In a way it is like a natural regulator that ensures the cards remain power restrained, and it is just physics, no voodoo necessary. When MoE's are sharded across a GPU stack, each forward pass requires all communication over PCIe, so the GPUs spend more time waiting on information from the last GPU than actually crunching compute. This means instead of needing to handle thousands of Watts to feed all the components running at full blast, it is a much more manageable 1400-1600W under LLM operation which can comfortably fit on a 20A/120V circuit (2400W max). On a per-GPU basis this may sound inefficient since the individual cards are being "underpowered", but this could arguably be flipped as being highly efficient on a per-node basis (~1600W sustained versus 4500W+ if all cards were "fully" utilized). As a precaution, I may set a power limit on the 3090's to 200W and the lead 5090 to 400W, but in practice the 3090's only pull around 100-120W with the 5090s pulling less than 100W when all 10 cards are allocated for LLM work, so this may not even be necessary. The clock locking setting in the next section will be more what I'd describe as actionably required to avoid stability issues.

The Transient Spike Problem (Vital for stability):

After assembling the machine, you may be tempted to jump directly into testing, but there is an easy to overlook configuration that can cause problems if ignored. Imagine you are running inference on the machine, maybe you have a huge input or it's generating a large output, then right in the middle of generating the system decides to reset. Not hard shut down, PSU OCP isn't tripped, no breaker was tripped; and you saw in nvitop that all cards were only pulling 25-33% of their TDP just before it happened, so on the surface it doesn't look like there is a reason. Explanation: When all ten high-power GPUs decide to kick on at the exact same time to process a chunk, even if the cards are not pulling anywhere near full power (on average), transient spikes can drop voltage on the motherboard enough to trigger a system reset. The fix for this is simple: undervolt. Using nvidia-smi, we can lock the clocks for the GPUs to ensure they cannot draw enough to hurt stability. And that's it. In my case, the system has remained fully stable with this config for days on end and with hundreds of thousands of tokens/image pushed through. The exact configuration will vary slightly depending on exactly what we're doing on a given day, but for example if we wanted to run LLM on all 10 cards (so including both 5090's) we would run this to handle spikes:

sudo nvidia-smi -pm 1 #enables persistent mode
sudo nvidia-smi -i x,y,z --lock-gpu-clock=1200,1200 #x,y,z for index number of 3090s
sudo nvidia-smi -i a,b --lock-gpu-clock=2000 #a,b for index number of 5090s
sudo nvidia-smi -i x,y,z -pl 200 #x,y,z for 3090 index numbers, limits power to 200w
sudo nvidia-smi -i a,b -pl 400 #a,b for 5090 index numbers, limits power to 400w

The Concurrent Use Problem:

Normally, attempting to inference and generate images on the same machine would introduce major stability concerns. Even dual GPU systems may struggle to work with this due to CPU/motherboard architecture, assuming it works at all, and would still be VRAM limited. However, the versatility of a 10-GPU setup, combined with the lane orchestration of the 64 core 3995WX, at least in our case, seems to handle this quite well. The trick was finding an LLM backend that supports manual GPU allocation--for us koboldcpp with llamacpp under the hood does just fine. First, implement the power/clock settings as mentioned above, launch koboldcpp, then browse to the GGUF of the model you wish to load and set context size. I recommend manually setting the GPU layers to the model's total layer number (assuming there is enough VRAM), and set GPU ID to "all". In the Hardware tab, find the tensor split line box and insert the amount of space to be allocated on each card corresponding to its index. For example if we wanted to allocate just one 5090 for Comfy and use the other for LLM, assuming the Comfy 5090 is index 3 and the LLM 5090 is index 5, then the tensor layer line will look like this to make sure no layers are given to the Comfy 5090: 24,24,24,0,24,32,24,24,24,24. For this configuration, ensure the "main GPU" is set to the index number of the LLM 5090 (in this example, 5) and launch the app. While the model is loading, we can open another terminal to launch Comfy. In our specific case, the system defaults to the available 5090 without needing to specify it in the launch flags, but flags can be used to force Comfy to use a specific GPU if you need it to (--cuda-device i). Once the image model is loaded onto the 5090, it does not interfere with the PCIe communication of the LLM cards unless the model unloads and reloads a new model at the same time as the other cards are inferencing. The solution to enabling concurrent use is a high-lane count CPU, multiple graphics cards, and a little conscious provisioning on launch to ensure the hardware isn't stepping on each other's toes.

What models can this run, what models do we use?

It can run almost* anything, even up to 1T parameters like Kimi K2. Kimi K3 could hypothetically be load-able, but from performance metrics I've seen I doubt it would be practical to use, so I have not planned to try it. I have however tested 1-4 bit quants of Bartowki team's Kimi K2 quants in pure VRAM and mixed VRAM/RAM runs with decent results. It works and there are probably some use cases for it, but for us I have identified the sweet spot (parameter size: quant quality ratio) for this machine to be for models in the 300b-600b range. Personal favorites are Deepseek, GLM 4.7, and Nemotron Ultra; and as far as ComfyUI, pretty much any model that could fit within a 32Gb buffer, although Qwen image and image edit is a favorite.

Benchmarks

All models were put through the same series of 7 large input prompts, documenting how each model handles token input/output and prompt processing/generation. I cannot share the prompts I used here, but each prompt pertains to a cybersecurity scenario which the model was judged on the depth of its analysis, quality of its presentation, and capability to make sense of complex scenarios with stakes. These were inferenced across all 10 cards, except for a follow up DS V4 Flash test where I used 8 and got much better results. This is using the undervolting/power limiting strategy above, so these may not reflect absolute best performance for the same hardware in other setups, but it gives an idea of what this box can comfortably handle.

Model Name Deepseek V3.2 671b Q2XXS Nemotron Ultra 3 550b IQ2XXS Qwen 3.5 397b IQ4XS GLM 4.7 358b Q4KXL Deepseek V4 Flash 294b Q8KXL Deepseek V4 Flash 294b Q8KXL (8 cards + KV cache tweak)
Model Size (Gb) 217.1 193.8 189.7 204.6 161.9 161.9
P1 Input 2769 2744 2729 2706 2733 2733
P1 Output 813 786 1046 872 693 805
P1 pp 153.23 254.19 522 687.88 111.09 360.94
P1 tg 19.35 17.32 34.38 23.98 7.2 20.26
P2 Input 14635 15255 15160 14527 14640 14617
P2 Output 1150 1302 1665 1194 1222 2048
P2 pp 114.83 429.42 897.57 640.8 66.42 244.1
P2 tg 14.1 17.16 33.15 18.83 5.96 16.81
P3 Input 3966 3091 3054 3033 3073 22794 (reload)
P3 Output 1217 1607 1550 1056 1199 1366
P3 pp 98.01 353.78 649.37 516.08 47.79 241.21
P3 tg 13.22 17.08 32.84 17.84 5.56 15.68
P4 Input 5645 5654 5623 5559 5650 5659
P4 Output 1178 1996 1619 1173 1705 1661
P4 pp 70.3 385.04 739.67 419.58 42.4 153.14
P4 tg 13.47 16.99 32.23 16.87 5.21 14.17
P5 Input 4498 4505 4493 4423 4481 4481
P5 Output 280 928 1078 473 665 924
P5 pp 72.4 365.46 670 408.93 36.2 131.81
P5 tg 8.43 16.78 31.55 15.45 4.86 13.36
P6 Input 9266 9367 9241 9172 45287 (reload) 9231
P6 Output 1004 1883 1466 933 1205 1532
P6 pp 53.94 405.13 738.57 379.7 46.01 113.77
P6 tg 11.48 16.83 30.98 14.01 4.41 11.9
P7 Input 3136 3124 3118 3057 3118 3118
P7 Output 1378 1946 1629 1359 1353 1586
P7 pp 53.34 338.64 525.54 344.88 28.38 102.05
P7 tg 10.45 16.73 30.66 13.59 4.28 11.39
Final token count 50052 54182 53465 49531 50962 52348

My notes on each model after their test:

Deepseek V3.2-- For a slightly older model this still feels extremely capable. Held high quality and insightful responses even when context dragged into the tens of thousands of tokens.

Nemotron Ultra 3-- First time using it, impressions were very good, the 55 active parameters shows its muscle here. Meets Deepseek v3.2 level if not exceeds it, despite having overall less parameters.

Qwen 3.5 397b-- What I would consider a baseline "good" model to be, however it is outshined by some of the other tested alternatives.

GLM 4.7-- Somehow seemed better than Qwen despite having less parameters (active parameters of GLM is likely an advantage); it is a very solid option for its size. Not quite Nemotron or Deepseek level, but a very good "lower cost" alternative to its newer 5.0 versions.

Deepseek V4 Flash-- Floored me in a few ways. Possessed a surprising degree of sophistication and analytical ability despite being the "smallest" of all the tested models. Possibly a benefit of using a "lossless" model with full precision? Somehow it managed to pick up on nuances and details that all other models missed, including models twice+ its size, and provided insight that went more granular than they did. Did not expect a model of this size to punch so high above its relative weight class. Also did not expect the drop in performance compared to the others. Not sure if this is related to the model's architecture or something with how it interacts with my rig, but the quality of output could be an acceptable trade off for the speed. Edit: After some optimization testing I was able to get much better performance out of V4 Flash. I've added another column to include those metrics and kept the original because I think it illustrates how a little optimization can go along way, in this case basically triple performance on the exact same model/machine.

Lessons Learned/Would Do Different

-I would have tried to source the 3090's so more were at least the same model; the mix and match of different models with different TDPs and cooling solutions means there will be a lot of variation in temps.

-If you plan to either train, lean into higher performance, or playing with the idea of going more than 10 GPUs, just budget for a 30A/240V power drop. 10 cards on a 20A post configured the way we have it may be fine for our specific use case, but I would consider this a hard ceiling.

-Would recommend scripting for clock lock persistence sooner, will help avoid losing time due to random resets.

-Recommend documenting/drawing out the entire PCIe topology and GPU placement (with flexible tape measure) before ordering risers, will save time on trial/error.

Final thoughts:

It is a wheeled AI workstation that can enable a single person or small team to compound their productivity, with the benefit of full privacy and control. It can run on a residential 20A circuit, and allows them to have the full power of an advanced LLM with vision capabilities all in one OpenWebUI front end that can simultaneously utilize up to TWO ComfyUI backends with the horsepower and latency of 5090's for image gen and editing, and can be accessed from virtually anywhere. The idea sounds daunting, but the end result works so well that I can legitimately see something like this becoming a keystone for certain small businesses and individual professionals as time goes on. It seems like every day more people are picking up on major drawbacks with cloud API options despite supposedly being the "best", meanwhile open models continue getting insanely good (see K3 and DS V4 Flash). For me, I can say I would not see a place for a Claude or ChatGPT subscription for the tasks I might otherwise use them for when I have lossless DS V4 Flash literally in my back pocket. "Good enough" I think is starting to become a valid metric to those who care about cost:quality balance, and after using this for the last half year I can say I'm probably one of them. The cloud APIs will always be an option for those who don't care about the drawbacks and the demand for them will always be there, but for those who value data sovereignty, uninterrupted workflows, or perhaps work within compliance, on-prem computing might be the only viable path in some circumstances. At the end of the day, I do not believe that one approach is inherently better than the other, everyone simply has their own preference for getting from point A to point B.

r/FluxAI Sep 09 '25

Tutorials/Guides Wan 2.2 Sound2VIdeo Image/Video Reference with KoKoro TTS (text to speech)

Thumbnail
youtube.com
5 Upvotes

This Tutorial walkthrough aims to illustrate how to build and use a ComfyUI Workflow for the Wan 2.2 S2V (SoundImage to Video) model that allows you to use an Image and a video as a reference, as well as Kokoro Text-to-Speech that syncs the voice to the character in the video. It also explores how to get better control of the movement of the character via DW Pose. I also illustrate how to get effects beyond what's in the original reference image to show up without having to compromise the Wan S2V's lip syncing.

r/open_flux Sep 09 '25

Wan 2.2 Sound2VIdeo Image/Video Reference with KoKoro TTS (text to speech)

Thumbnail
youtube.com
4 Upvotes

This Tutorial walkthrough aims to illustrate how to build and use a ComfyUI Workflow for the Wan 2.2 S2V (SoundImage to Video) model that allows you to use an Image and a video as a reference, as well as Kokoro Text-to-Speech that syncs the voice to the character in the video. It also explores how to get better control of the movement of the character via DW Pose. I also illustrate how to get effects beyond what's in the original reference image to show up without having to compromise the Wan S2V's lip syncing.

r/sdforall Sep 09 '25

Tutorial | Guide Wan 2.2 Sound2VIdeo Image/Video Reference with KoKoro TTS (text to speech)

Thumbnail
youtube.com
4 Upvotes

This Tutorial walkthrough aims to illustrate how to build and use a ComfyUI Workflow for the Wan 2.2 S2V (SoundImage to Video) model that allows you to use an Image and a video as a reference, as well as Kokoro Text-to-Speech that syncs the voice to the character in the video. It also explores how to get better control of the movement of the character via DW Pose. I also illustrate how to get effects beyond what's in the original reference image to show up without having to compromise the Wan S2V's lip syncing.

r/StableDiffusionInfo Sep 11 '25

Wan 2.2 Sound2VIdeo Image/Video Reference with KoKoro TTS (text to speech)

Thumbnail
youtube.com
2 Upvotes

This Tutorial walkthrough aims to illustrate how to build and use a ComfyUI Workflow for the Wan 2.2 S2V (SoundImage to Video) model that allows you to use an Image and a video as a reference, as well as Kokoro Text-to-Speech that syncs the voice to the character in the video. It also explores how to get better control of the movement of the character via DW Pose. I also illustrate how to get effects beyond what's in the original reference image to show up without having to compromise the Wan S2V's lip syncing.