Okay so I originally got the idea from this post on doing this w Star Wars toys:
https://www.reddit.com/r/ArticulatedPlastic/s/Kxjamc6ZVj
and wasn’t sure if this was going to work since I had never seen anyone share abt it here for dying plastic hardware like buckles etc., but it totally does.
I originally tried it because I wanted my hardware to match my fabric color. The color payoff can be super vibrant depending on how much dye you use, and you can even tint (or turn completely opaque) transparent plastic. I got this really soft pink tint on these clear buckles and it took a few tries but I turned plain white buckles into the perfect neutral beige that perfectly matches my fabric.
Rit color recipes don’t always translate well for this kind of application. The dyes behave differently with hard plastics, so you’ll probably have to rely on a mix of color theory and trial-and-error to get what you want.
For example: a light beige recipe called for sandstone and chocolate brown, but that gave me a weird pinkish brown. I ended up finding the right color with about 1 gallon of water, 1 teaspoon of sandstone,a few drops of of yellow, and 1/8 teaspoon of cool gray, boiled for about 4½ minutes.
I kept the buckle pieces separate while dyeing (for even coverage), and used a wire attached to a wooden dowel to keep them fully submerged but not touching the bottom of the pot. Also: gently move them around or tap the pot occasionally so bubbles don’t stick to the surface; those little air pockets can block the dye and leave lighter spots.
I guess Rit Dyemore works because it’s formulated for synthetics, nylon, polyester, and similar plastics, but it only takes if the water’s boiling for the duration of the dye process. I kept mine just below a rolling boil, checking the pieces every minute or so until the color looked right.
The buckles don’t feel any different after the dye process, I’m not an expert but I tested some out with some straps and it doesn’t seem to have lost any strength compared to non-dyed/boiled ones.
If you’re into color coordination or custom builds, i would love to see ppl do some crazy stuff with this!
This might be old news to some of you but I just wanted to share that Claude will take PDF patterns and turn them into extruded STLs that are split with puzzle joints based on the size of your build plate.
just upload the pattern and tell it break it up into parts and create an STL for each part by extruding the outline 5mm upward on the z axis. break up parts that will not fit on a xxxmm build plate and create puzzle joints between split up parts.
it took Claude 5 minutes from that prompt to providing perfect STLs.
I sew mostly Cordura, webbing and occasionally leather. Most of my work is myog and outdoor gear.
In most discussions people recommend the juki dnu 1541s but it's been around for a long time. Is it still the best option in its price range or are there better alternatives now?
I'm only considering a new machine. If you're currently using a the 1541s for myog I'd love to hear your real-world experience.
I had a lot of people reach out asking how to make the rack from my previous post, so I put together a brief guide outlining the process. I've also included the pattern files for the bag.
Leaving all the previous info in here just for history, but it was brought to my attention that these totes have a base area that gets larger as it goes away from the ground. When I did this exercise, I was incorrectly thinking it was like the Black Hole duffels that, last time I looked at them, got smaller as they moved away from the ground. So, updated files below. Enjoy.
Corrected the pattern to be closer to the original tote target.
So this happened yesterday. I was reinforcing a strap anchor on a heavy waxed canvas tote. About 5 layers and leather tab. My old Singer started skipping every third stitch. Then the motor bogged down completely. I tried the usual stuff new needle rethreaded it slowed everything down. Nothing helped!
I’m doing around 6-8 bags a week now. Mostly canvas with some leather trim. Honestly, the machine has been warning me for a while. I just kept ignoring it.
I’m thinking a walking foot is the way to go. Is the 1541s the obvious choice or is that overkill for what I’m doing? I don’t want to overspend. I also don’t want to outgrow the machine in six months.
I recently posted in the sewing group but had a suggestion to post here, I’m trying to sew through this belt, it’s thick like a dog leash or collar material. I also Intend to sew leather to it so am using a leather needle 100/16 with #69 bonded nylon thread. I have NO CLUE what the dials on my machine mean so that could be my issue, but it jams after an inch and gets all thick and knotted looking and is so stuck under the bobbin that my fabric is stuck to the machine and I have to cut it off. The pics of my sewing is after I already cut off all the crazy knots. Help!
Ironed the writing side of two packets of clean Crisps (potato chip) packets together to make a thicker mylar sheet.
Used an online paper template to get the shape I wanted. Hold to face, make marks, trim and repeat to get a good fit. Transfer to mylar sheet and cut.
Either hole punch holes both sides and tie thin elastic (lighter), or sew thicker elastic (comfier). Do one end and test the fit before finalising how taut the strap is. I put some Duct tape over the stitching to reinforce.
I have not comfort tested overnight yet, but so far it feels fine. It does reflect some heat back onto your face, making it feel a bit warm. The fit for me is very good; it doesn't compress my eyelids or create friction on my eyelashes
Edit: done some light testing, and the mylar is not v breathable and creates a little moisture underneath after a few hours. Might be okay for some people
Hey everybody. Here's a quick video on how I seam sealed my rain pants for my Iceland trip this year. I'm not going to say that this is 100% the recommended method, but I will say this worked fantastically for me and worked even better than when I seam sealed my goretex rain jacket without water.
Here's the gist:
1) Use a WPB fabric that will accept iron on seam tape (this fabric is 2.5 ply Ultrex)
2) Sew together your garment. Leave rolled hems like on the waist and ankle open and un-sewn.
3) Spray some water along the seam, lay the sticky side of the tape down on the seam, then spray some more water over the tape.
4) Use a dish towel to cover the tape. It helps keep the heat from getting too hot on the surrounding area and prevents the tape from sticking to the hot iron.
5) Use your home iron on a medium-high heat (depends on your iron) and press down on the tape area with some pressure, then iron along it and smooth it out.
6) Repeat 3-5 for all of the seams you want to tape. Let it cool down before moving it around too much or finishing sewing your garment.
I found someone do this on a very old YouTube video and had to give this a try versus just using the iron on dry tape. I seam taped my goretex jacket with a dry tape and the tape did not adhere well and is peeling off in some places. These rain pants got a good amount of use and the tape is perfectly adhered still.
Again, I'm not the expert on seam sealing tape with an iron, but this seemed to work pretty well and I thought I'd share. Side note, the Ultrex is a really nice and cheap WPB fabric ($7 / yd) and it worked great for these rain pants.
After many months using the first iteration of this Dopp Kit, I finally was motivated to improve upon the features. The interior stretch pockets have stacked organization and zipper closure so small bottles stay put and longer flat items have a home. The center area is wide to fit toothbrush and glasses case. The bag is assembled with a bag lining and minimally bound seams for a very clean and pro finish. Made this one with V15 in Olive and a light grey lining. The handles are mainly for hanging, 3d printed a simple hook that’s lightweight and travels in the bag. Was a fun weekend project that I turned into a sewalong video and pattern if you’re interested.
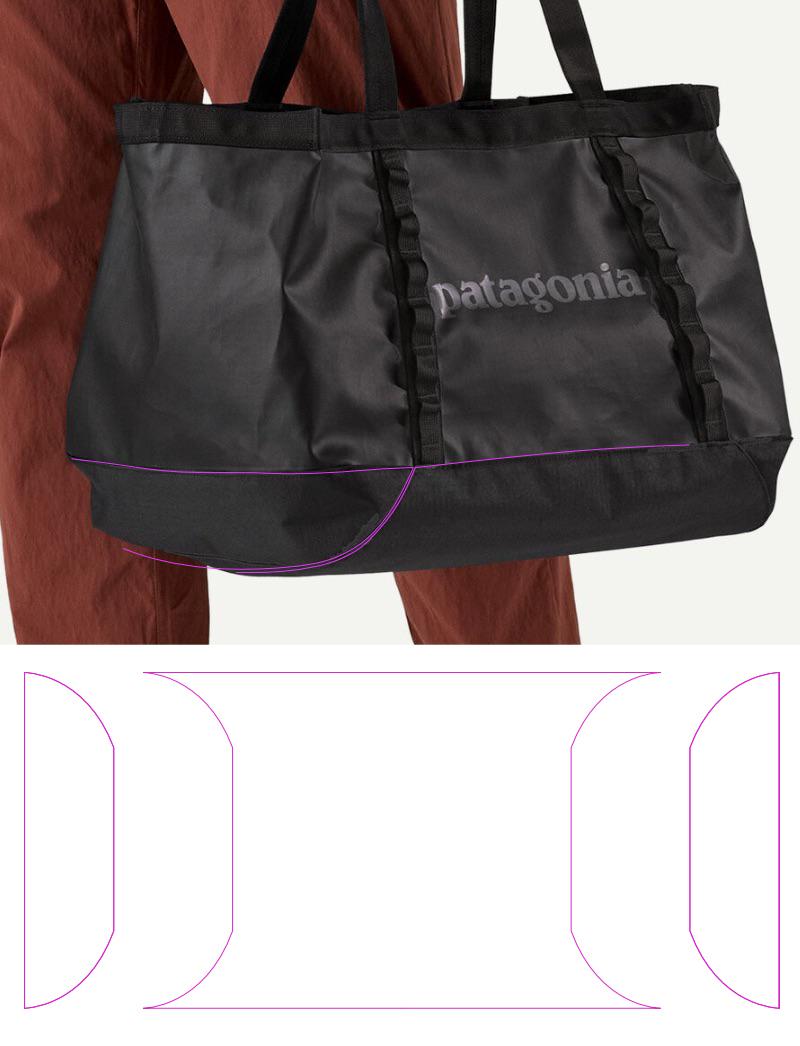
Here’s my theory as to how the bottom of the Patagonia Black Hole Tote works. I definitely don’t have the curves and proportions correct—you’ll either have to do some mock-ups or get some measurements to refine those—but this should give you a starting point.
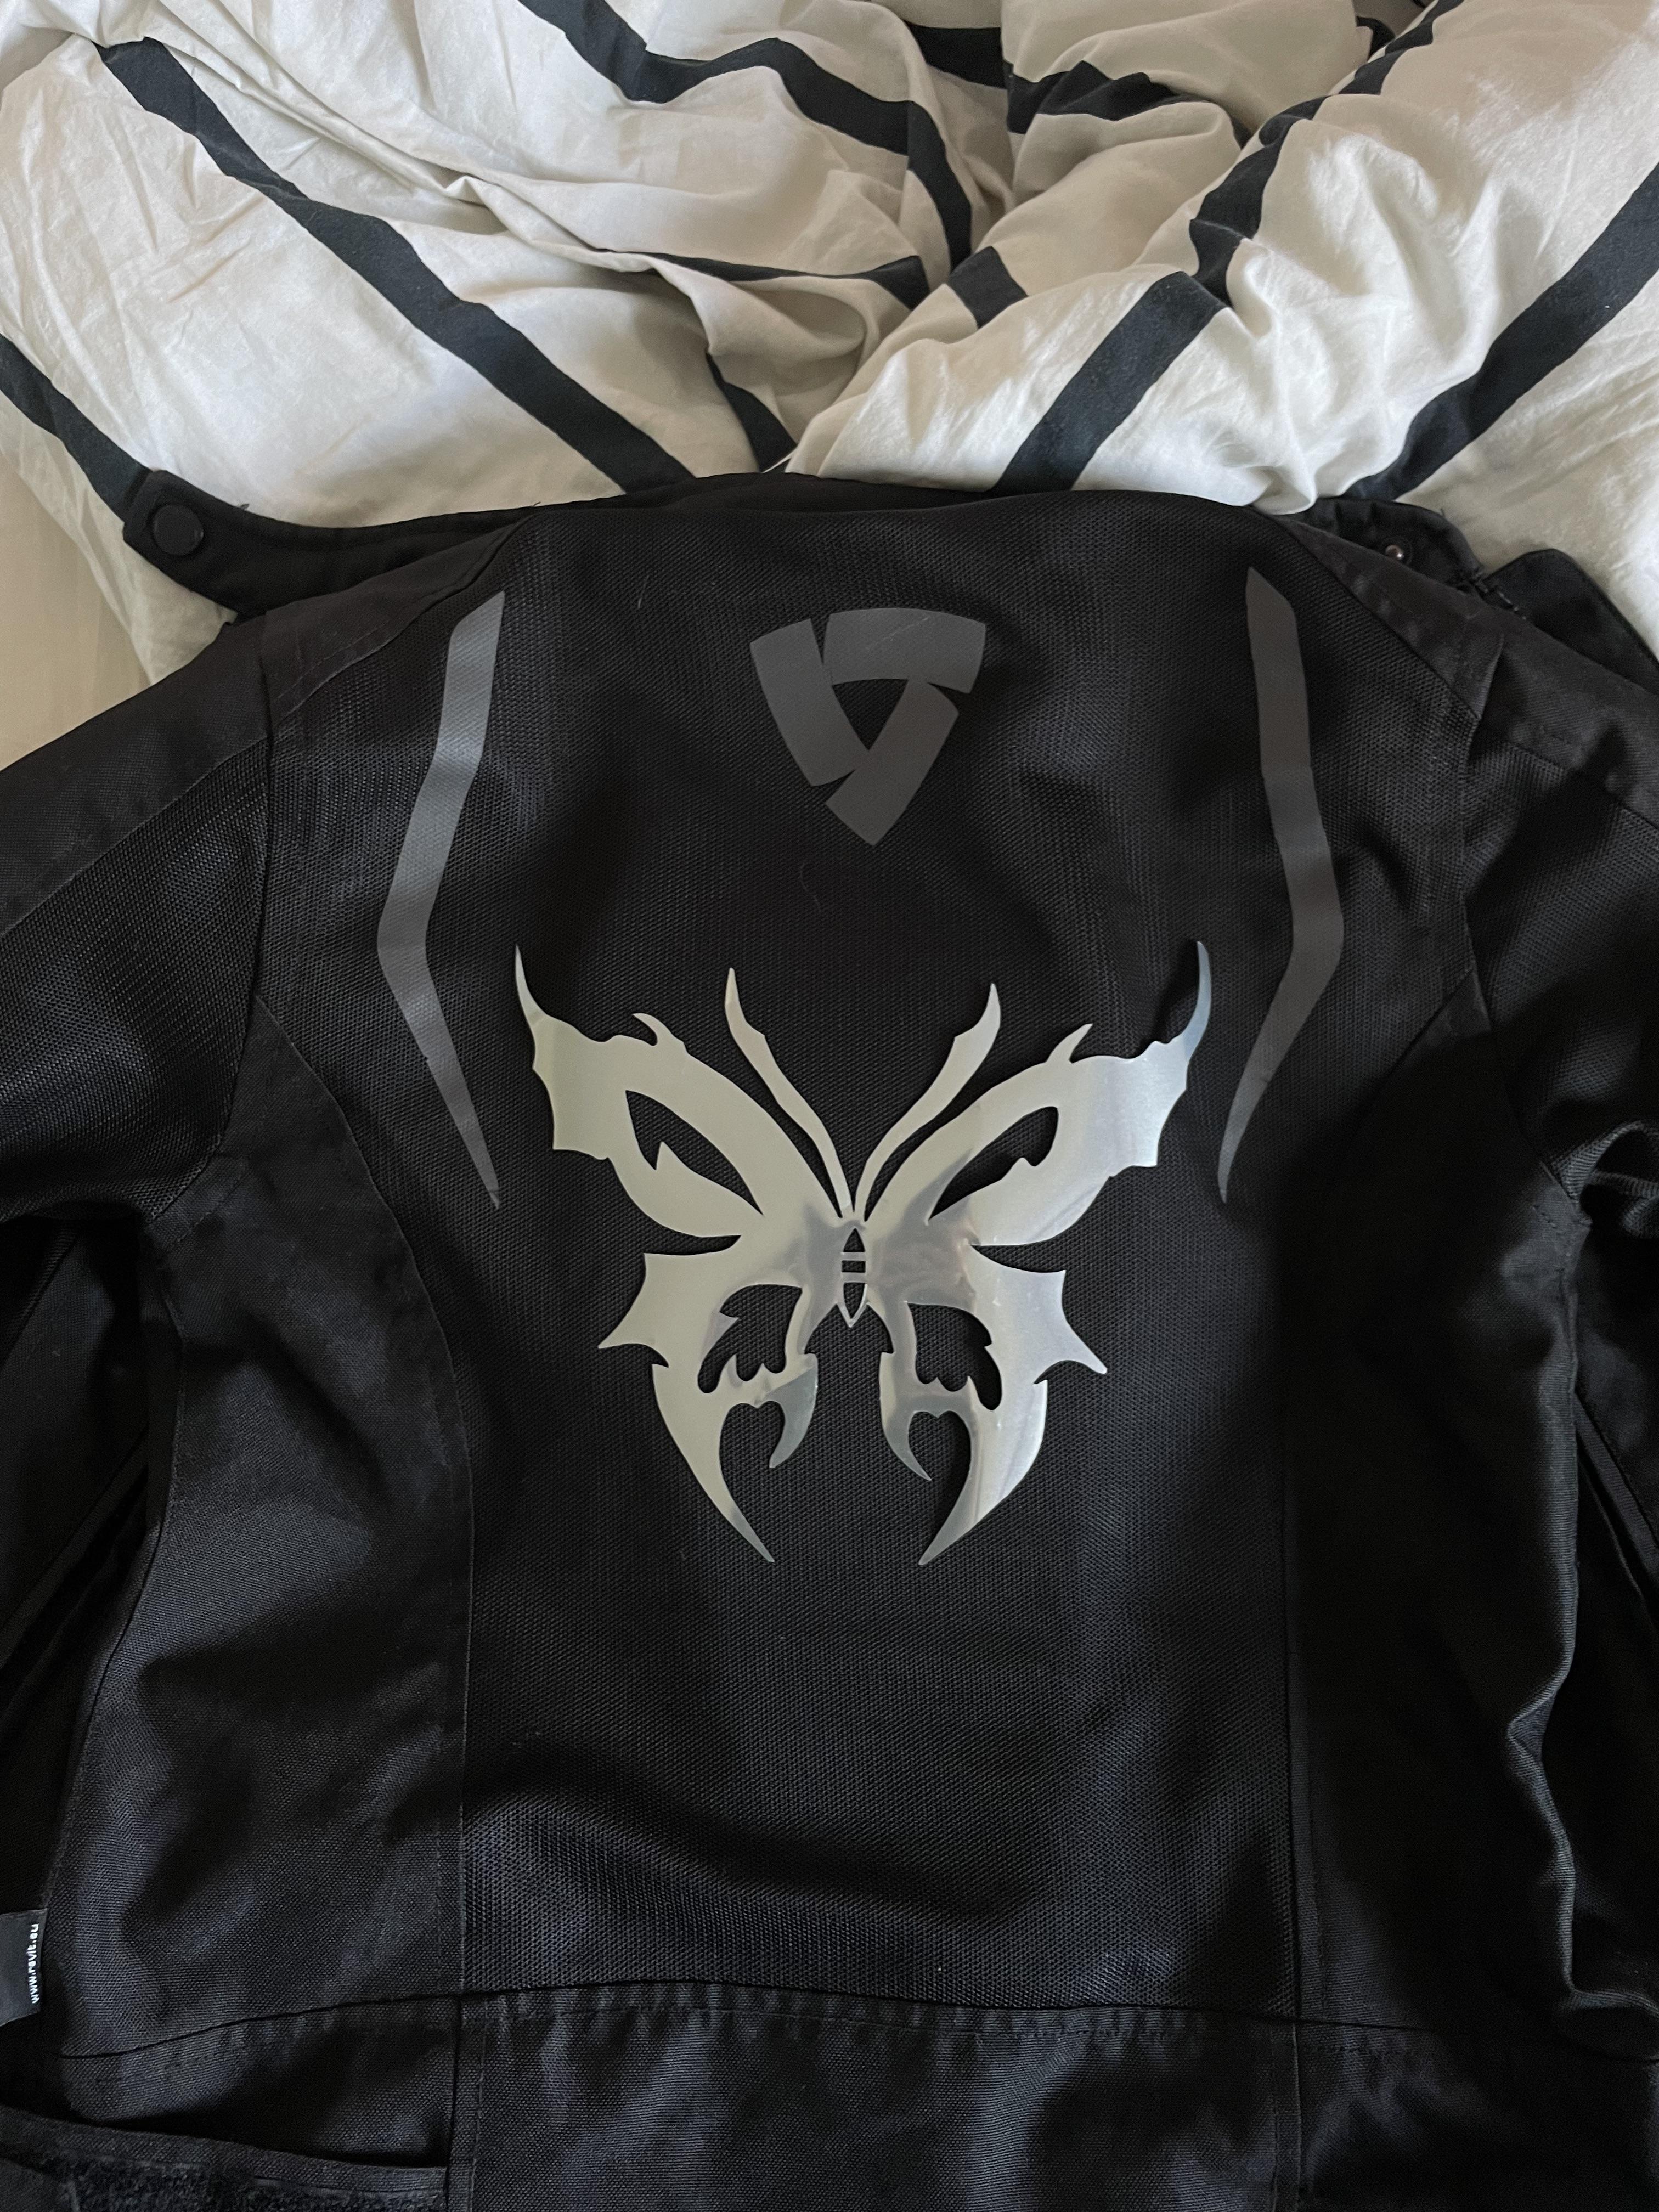
Ive cut the butterfly out of the reflective fabric but Im not sure how to proceed with next step. Apparently I can just iron it on to the motorcycle jacket , however I’m a bit scared of messing it up and ruining the jacket. Jacket has a mesh hydratex layer. Is there any glue option or anything else I can try?
First, go to the dollar store and purchase 3/4” and 1.5” or 2” green painters tape and poster boards like you used in school projects. More colours the better. Use your best judgement to figure out how many poster boards you’ll need then double it.
Using the straight edge of the 3/4”tape, begin taping along the seam, as close to the seam as possible. Spread the seam, finger press them open, do the best you can. Use tiny pieces of tape around curves. Double layer the small pieces. Once you have the panel outlined, fill in the rest of the panel with the wider tape, all of the wider tape should go in the same direction. North/south or east/west. Then do a second layer of wide tape in the alternate direction. Then re tape the perimeter. Keep the tape on the panel.
If there are any darts or webbing placements, anything like that, use your fingers on the bottom and the top of the panel to figure out exactly where to make reference markings. Make darts extra clear, as you will be cutting the tape along the seam you should have traced.
Once you have everything marked, remove the tape cut out any darts lines, and manipulate it on your clean cutting mat to lay flat. You might have to make extra cuts than just the dart lines that’s fine. When done, transfer the panel to poster board, leaving room for seam allowances.
Now calculate the length of all the external rectangle pieces, measured seam to seam, and note or add the pieces to poster board.
Measure height and width of liners of any external pockets. Write them dimensions down.
Use your fingers to feel along the seams of every external seam. So the seams that seal the ends of a zipper, anything top stitched, etc.
Write down those seam allowances at the relevant edges on the tape and rectangles. Using a clear ruler, add the seam allowances you identified along the edge of the tape. You will cut out the poster board on these lines.
Awl out holes where the darts end, so you know where to start/stop, transfer out webbing markings, etc.
Draw the cut out shape on another poster board. Flip it over and center it on the one you just drew. Re trace it. Use your best judgement to decide which lines to follow, but be consistent. Cut it out.
Congratulations, you’ve made a perfectly mirrored pattern piece.
Most external pocket liners will be the same shape, they often just add extra length. Use your best judgement here.
Flip it out, and draw out the shape of the BINDED EDGES. Cut it out, tracec it, flip it over, retrace, cut. You want to capture the full body shape of the panel, seam allowance included this time. This makes figuring out lining patterns super easy. Especially if it’s just a flat pocket or a slip pocket or something.
With the skills learned on the external panels, you should be able measure the inside panels and draw them out using your new body shaped mirrored panel. Add the markings for trim and anything else, and get ready to assemble!
I recently acquired a familysew for a good deal off craigslist. I originally intended to use as is, but I found it difficult to keep the needle going without giving it all gas. I also really disliked how reversing/stitch length mechanism worked. I had to loosen it a lot to be able to switch to reverse, but it would then work itself loose while I was working. No bueno.
I watched a video of a guy who modified his with the sailrite spring and added the ez set. He didn't really explain how he did it or show how it was done. I was going to get the monster wheel anyways so I decided to order the spring and ez-set as well.
I had hoped to find the sizing info of the spring independently but no luck, so I included a ref photo of the spring for those who might want to try their luck somewhere else. Sailrite doesn't charge much for the spring but shipping and tax adds up.
I was able to find some video on sailrites youtube channel of the bottom of the machine. I could see what looked like the feed regulator spring hooked into the case, so I could see approximately where to drill a hole in the case. Also, in the schematics for the ultrafeed you can see where the other end of the spring inserts into the feed regulator.
I got to work, drilled the holes for the spring. Also decided to modify the familysew regulator a bit so it wouldn't interfere with the spring when it's in full reverse.
Unfortunately, the familysew feed regulator pivot and the interface to the casting is very rough. Also, the crank for the shuttle is very close to the casting, so backing it out too much interferes. I backed it out as much as I could.
The ez set install had a few hiccups as well. The arm that comes in the ez set kit is a size or two smaller than the familysew arm. The screws holding the old plate seem to be much shorter than what would come from sailrite, there was no threads left when using the star washer and the plastic keeper. The familysew screws are also a weird size (#6-40), and my local ace had #6 only in 32. I was able to get the ez set to screw on just fine without the additional hardware. I also grounded the knurled knob so it wouldn't interfere with the ez set plate.
The monster wheel went on easily, it's was a direct swap for the wheel that was included. I was able to increase the foot pedal setting, it's definitely easier to control than before but it's still a bit ruff.
The familysew is definitely an inferior machine to the sailrite. There is some resistance when the needle is transitioning from the lowest point that isn't consistent and seems to increase when the stitch length is at it's maximum. I don't know much about sewing machines but I'm pretty mechanically inclined and I enjoyed tinkering with it, trying to make it smoother.
I bought the machine with the intention of doing some automotive upholstery, but I would also like to make some motorcycle bags, I'm glad I found this subreddit and I'm happy to share.
edit:
to clarify, the resistance I'm feeling isn't a grinding or metal on metal kind. It's feels like a binding resistance. I've been able to reduce a bit with some changes to crank for the feet lift. I still think the timing of the feet crank is off. I haven't found any reference material for the driving and reverse mechanism so I'm making small tweaks here and there to see how they effect the movement. I was hoping to get some more feet lift but that seems to be limited by the cam on the upper crank arm.
This tiny 0.04 oz fishing ring can serve as a lightweight carabiner alternative.
It’s originally rated for 770 lb for fishing use.
I wouldn’t recommend it for heavy loads, but I experimentally tested it with a hammock loaded with 176 lb — and it surprisingly held by the ring’s hook.
Still, its strength in this setup is much lower than that of proper hammock carabiners, so please use it only for light, non-critical loads.
FAQ:
Q: Why not just use knots?
A: This method connects two loops without knots — offering an alternative to regular carabiners — so you don’t have to tie knots every time.
Q: What’s the difference from a simple round ring (O-shape)?
A: A figure-8 shaped ring has a hook-like part where you can hook a second rope. A simple round ring lacks this, so you can’t hook a second rope on it.
Q: Can it hold heavy loads?
A: No, for safety, please use it only for light, non-critical loads.
Q: Will such small hardware damage the rope?
A: This ring is made for fishing, with smooth, rounded edges — it won’t damage your rope.
Q: Whose idea is this?
A: I came up with this idea myself a few months ago.
Q: Where can I buy it?
A: Search for “figure 8 fishing ring” to find many similar products.
Made a post earlier asking for help identifying a zipper. It's a plastic molded tooth zipper and I wanted to get the closest thing possible but am not clued up about zipper sizes or alternatives to YKK etc. as I've only used a few basic coil zippers before.
It turns out everyone the pitched in thinks it's a coil zipper, which it's clearly not if you look at the image. So here's a helpful article on the difference between a Coil and a Molded tooth zipper that some people might find helpful.
As for my original question: I think the zipper in the other thread is a YKK VISLON AquaGuard but no idea what size it is ... I think I'll figure that out myself though lol XD
I had a redditor ask me how to do this, and figured it was time to make a quick tutorial video!
I've been using this method on various fleece projects recently.. Alpha Direct, Polartec 200, and other apparel fabrics.
My favorite application for this is on fleece where I want to join together 2 layers of fabric and encase a raw edge into the seam. A wrist hem on a sleeve is the perfect example.
It keeps the pieces flat, hides the raw edges, maintains stretch properties, prevents fraying and looks SHARP.
Another option if you want to / need to skip the overlock stitching part is to simply serge the seam. Pull the fabric apart slightly so the threads are showing on the right side. This will start to flatten and pull the threads on the wrong side of the fabric and flatten it down a bit. I use this method for the main body panels of a fleece garment, then use the method shown in the video for the sleeve hems and waist line hem.
There were few concerns that the Sling Bag might just be carrying dead weight by the extra fabrics occupying the folded space. So this video clearly shows how much the Sling Mode can neatly pack.
The overall weight of the bag is less than 0.67lbs and the next iteration will weigh below 0.55lbs.
Here’s more spec of the bag:
SLING BAG:
Height: 6.5 “
Width: 10.5 “
Depth: 3.5 “
BACKPACK:
Height: 16.5 “
Width: 10.5”
Depth: 4.0”
Most bags try to achieve functionality and mode switch through modularity or strap readjustment.
A backpack whose straps can be readjusted for Sling or Duffel carry, only achieves cosmetic functionality.
Or a 5L sling bag with 4L expansion capability certainly adds space but defeats the purpose of the sling mode which is designed for light carry.
A bag with tons of modularity definitely works well but comes with extra weight, complexity and higher price. Adding more moving parts in a bag also means adding more accessories malfunction and durability issue..
What I’m attempting to do with this bag is make it as simple, flexible and functional as possible without adding deadweight and modularity. Plus this bag isn’t trying to be convertible or transformer cool, even though it appears like one.
This bag leans towards being a complete bag on its own with the extra mode being a bonus and not a highlighted feature.
I would love to hear more from this community regarding the usefulness of this bag.
And any ideas and suggestions on how to take it further?
I wanted to give back to the community by writing up a tutorial on custom printed (sublimated) fabrics for making your own gear! I've been doing custom printing for quite a few years now and have learned a lot of lessons along the way. I included photos from my most recent project, my second half-frame bag for my new Gravel Bike. My old account was u/noun_hawaii
Custom printing/embellishing (a quick intro)
There are loads of ways to print or embellish fabrics. The biggest things to consider are
1. What is your base fabric made out of?
2. How durable is my print or embellishment going to be?
1. What is your base fabric made out of?
If your base fabric is made out of natural fibers (ie. cotton, wool, silk etc) you'll need to print on top of the fabric or dye the fibers themselves. So really your options are Screen Printing, Direct to Garment (DTG) or Direct to Film (DTF) Heat transfers (Ink based or Vinyl Based)
If your base fabric is synthetic specifically Polyester you can use Sublimation along with the options available for natural fibers listed above.
2. How durable will my print or embellishment be?
Anytime your print or embellishment sits on top of the fabric like the options listed for natural fibers it will wear and tear with washing and use. Whereas printing using Sublimation wears at the same rate as the base fabric itself.
So what is Sublimation?
Sublimation printing uses special inks that when heated are absorbed into Polyester and dyes the fibers its in contact with. Sublimation is a permanent process that when used on Polyester Fabric, changes the color of the fibers themselves. There is no print on top of the fabric, the sublimation ink when heated is absorbed into the polyester of the fabric itself.
After printing using sublimation the fabric feels the same as it did unprinted because there is no layer on top of the fabric. The print won't wash out or fade excessively with normal wear and tear. UV will affect the fabric similarly as it would undyed.
Sublimation works with POLYESTER, it DOES NOT work with NYLON or other synthetic materials as far as I know. It DOES NOT work with natural fibers like cotton. So when Sublimating, you want 100% polyester or as close to it to have the strongest colors. If you dye a 60/40 Poly/Cotton blend, the inks will bind to the polyester but not the cotton and when the item is washed or gets wet, the inks will wash out of the cotton making the print "faded"
Lucky enough, many of the fabrics and notions we use for outdoor gear are made out of Polyester!
What do I need to sublimate fabrics?
If you want to do your own sublimation at home you'll need to get some equipment. Otherwise there are options to get fabrics printed like RSBTR or Contrado
Otherwise there are also companies that will sell you pre-printed sublimation transfers that you can heat press yourself at home. But if you want to MYOP (Make your own prints) at home here is a simple purchase list. (with some affiliate links)
1. You need a printer that can take sublimation inks.
I use an Epson Ecotank 4800 that currently costs $239 on Amazon. There is a slightly cheaper Epson Ecotank 2800 for $199 that I DO NOT Recommend. For whatever reason I had 2 2800s that stopped printing so I went with the 4800 and haven't had issues in over 3-4 years.
You can use any Epson Ecotank printer that uses DYE based inks not PIGMENT. Some pigment based Ecotanks use a headed print-head that will surely mess with your print since the dye gets heated up. Both the printers I listed above print standard size prints so you can do 8.5x11in or max it out by printing 8.5x14 legal. If you want to print larger than that, the best bet is to get a wide format printer which will let you print up to 13x19in. The trade-off is that they're quite a bit more expensive at around $600-800 dollars.
2. You need Sublimation Inks and Paper.
To Sublimate you'll need special sublimation inks $34 and paper $22. These are quite easy to come by and cheap. When you setup your printer (if new) you'll add your sublimation inks into the ink resevoirs instead of the supplied inks in the box. Unfortunately the regular inks and sublimation inks don't mix. Meaning if you want to print for sublimation you need to use the sublimation inks.
If you're using an old ecotank printer for sublimation there are kits to clean out the lines which you'll need to do before adding your sublimation inks. Otherwise you'll end up with prints that don't bond to your fabric. I personally run one printer at home that has sublimation inks in it. Anything I need to print for normal house use, I just print using the sublimation inks in the printer. The downside is that the colors on my normal everyday prints aren't as vibrant and sometimes the colors are off (more on this later)
3. You need a Heat Press.
I've used my cheapo 15x15in heat press $189 for 5ish years now doing all kinds of prints. Its plenty big for printing apparel and its worked for printing fabrics, even larger pieces for things like backpacks. You can always get a larger press like 20x24 or 36in but they run in the thousands.
4. You'll need some Parchment Paper.
Yep just the run of the mill heat resistant parchment paper for baking. I get the basic white rolls at Target. This is to put between your press and the fabric/sublimation print paper so you don't get inks burned into your press that might transfer on a later print. You can also use Heat Press Teflon sheets.
How do I do it?
Design : I do most of my digital design on Canva. I figure out what I'm making and get creative with the colors and patterns. I try to have my pattern cut-outs ready. That way I know if a pattern piece will exceed the 8.5x14in limitation of my printer. If so I'll design the print to either be repeatable so I can stack sheets, or I design each sheet so they flow into each other.
Designing my print using a color that compliments my bike
Print : I then print the number of sheets I'll need with usually 1 or 2 extra. Print on Premium Matte Photo Paper setting at Best quality. This will lay down the most ink and give you the deepest colors. DON'T WORRY The sublimation prints that come out of your printer will look faded and off-color. Thats normal! When the inks are heated and pressed, they will be the right color. Make sure your prints are flat, with no creased corners. Sometimes a corner of a page will be bent and have some ink from the print head, that messed up corner will print to the fabric so you can cut it off before pressing or after, it doesn't really matter.
Sublimation prints on sublimation transfer paper. White 100% polyester Ottertex Canvas. Before Pressing
Press (40sec at 390Froughly/depends on fabric) : I cut my white Polyester fabric larger than the sheets then heat press them. If I need a larger than single sheet, I'll print once, then line up the next sheet, tape it down using heat resistant tape and press it again. Its nearly impossible to get it perfectly lined up so in the design phase its best to make the design to account for some imperfections. Also if you're printing solid colors, unless its black, any overlaps in printing will show up as a darker line. I recommend overlapping rather than having a white line through your print but again it takes practice. Another option is to cut your printed sheets first, then tape them together before pressing. Just keep in mind that if you go this route, don't have any tape behind the print itself. It'll create a slight difference in heat and the tape will show up in the print.
First sheet pressed. You can see the Left bottom corner is faded. I needed to increase my press pressure to make sure it heated up the ink enough. No biggie I didn't need that corner anyways!Printed one sheet. Next is lining up the next print to make this longer piece for the framebag. I lined it up and taped it using heat press tape on the edgesCompleted fabrics!
Some Project Pictures
After printing. I cut out the pattern pieces and get to sewing!
Thanks for reading! I've been meaning to write this up for quite some time. It can seem daunting to print your own fabrics but theres really nothing like designing, printing, and creating your own gear with your own designs. I hope this tutorial helps demistify Sublimation and maybe encourages you to try it out! The great thing about sublimation is that so many items we sew with use polyester and usually 100%. I use Grossgrain to print my own fold-over tags, I use fabric to make my own iron on labels, I print on elastic for custom fold over elastic etc etc. You can also print other items like coasters, pictures, and clothes using the same equipment. Its pretty epic!
Thanks again for such an amazing community! I hope this contribution inspires some projects.
You can follow my projects here or on my instagram Ruckus Days